Sharpening Images in Adobe Photoshop Lightroom…
by Rodney Campbell on Jan.21, 2011, under Life, Photography
I use Adobe Photoshop Lightroom (currently version 3.3) for all my photo management and the vast majority of my post production editing.
The tools are getting extremely good these days and one aspect of working with images is Sharpening.
There is a tendency these days for people to oversharpen their images so a prudent use of the tools available is advised – however all digital images need some level of sharpening to produce an aesthetically pleasing result. If you shoot JPEG images your camera will by default apply some level of sharpening directly to your images as it creates the JPEG file, if you shoot in RAW then the images are stored unsharpened and you will need to apply an appropriate level of sharpening in post processing. Note however that sharpening is not going to fix an out of focus image.
There are actually a number of types of sharpening available in your image workflow – input sharpening which is applied before or during your main post processing and editing, local or selective sharpening during post processing and output sharpening which is applied when outputing files for specific purposes.
First some of the problems you might see if you oversharpen your images: Increased noise, especially if the shot was taken at high ISO to begin with; Jagged lines and edges and “crunchy” detail, especially if a large amounts and radius are used; Haloing, bright glowing edges around dark borders and vice versa, especially with large radiuses.
Input Sharpening
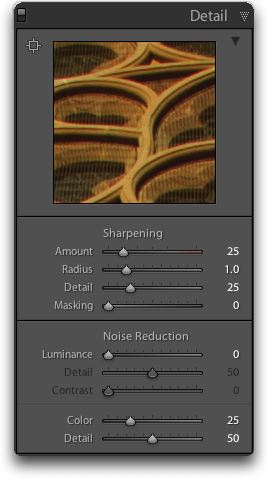
Input sharpening is applied in the Detail panel of the Develop module. Whilst you don’t absolutely have to, you should generally view your image at 100% (1:1) when you wish to make and see the effects of sharpening adjustments.
In Lightroom 3 there are four sliders available to adjust sharpening:
- Amount: pretty self explanatory – 0 means no sharpening and 150 means maximum. If this is a RAW file you’ve imported into Lightroom then a default amount of 25 is applied to cater for the fact that RAW’s are not sharpened in camera (you probably want to normally use values in the 25 to 75 range)
- Radius: the size of the sharpening area in pixels around an edge. The default value is 1.0 and I would seriously reccommend you only use values in the 0.8 to 1.2 (perhaps up to 1.5) range
- Detail: controls the amount of sharpening on the “details” (the smaller edges), smaller values only sharpen large edges whereas higher values go out and find even the smallest details to sharpen. One example might be for a portrait we’d use a low detail to give smoother skin but for architecture or leaves or other finely textured objects we’d use a large value for detail
- Masking: allows you to mask out areas of the image which should not be sharpened allowing you some level of selective control. 0 by default means everything gets sharpened and as you slide to the right more areas are masked
Like many adjustment sliders in Lightroom each of the controls can also be modified by holding down the Option (Mac) or Alt (PC) key whilst adjusting so you can see the effect of adjusting the slider. The most useful slider to use this method on is when adjusting the Masking slider as areas of white will be sharpened whereas areas of black (masked) will not. This is perfect for masking out areas of almost flat colour (e.g. skies, out of focus backgrounds, etc) and especially those with some noise/grain in them already as the sharpening will be excluded from those areas and thus will not increase the noise.
Local Sharpening
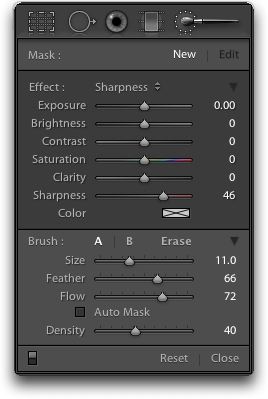
It is also possible to apply some level of localised sharpening using the Adjustment Brush in the Develop module where you can paint a level of sharpness to particular areas of the image.
Output Sharpening
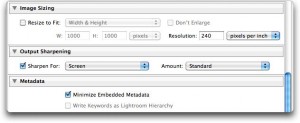
Output sharpening is controlled in the Export window and is normally used in circumstances such as:
- resizing and saving files for viewing on screen (the web or emails) – when a file is resized (reduced in size) sharpness is generally slightly decreased so some additional sharpening is required
- outputing a file for printing – when an image is printed the inks generally spread a little and the file needs to be sharpened a little more to account for this
The output sharpening available in the Export dialog is not as flexible as the tools available in the Develop module – the sharpening is applied globally to the whole image and you only have controls to sharpen for Screen, Matte or Glossy papers at an Amount of Low, Medium or High. I’d suggest sticking with Medium for most circumstances (Low does basically nothing).


February 22nd, 2012 on 6:03 am
I am really impressed with your writing skills as well as with the layout on your blog. Is this a paid theme or did you customize it yourself? Either way keep up the nice quality writing, it’s rare to see a great blog like this one nowadays..
November 28th, 2012 on 4:06 pm
Adobe photoshop is really a great piece of photo editing software.