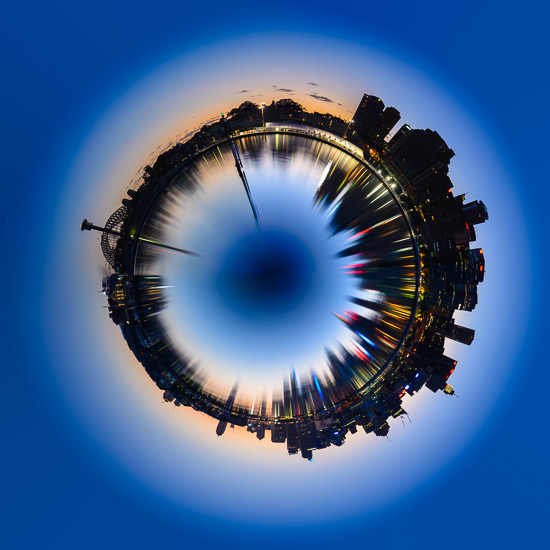
Panosphere – aka Little Planet…
by Rodney Campbell on May.22, 2013, under Life, Photography
I’d thought about trying my hand at a panosphere (often called the “little planet” effect) for some time now. The effect is produced by a type of image projection (usually on panoramas) to show a picture as if it was a small world.
The method for creating a panosphere is relatively simple (see below) – I’d just never gotten around to actually trying one till now.
I took one of my existing stitched panorama images (originally from this post – Sydney at Dawn from Balmain) and tried the conversion to panosphere.
Sydney Eye
Technically you can use any image (doesn’t even have to be a panorama) to do this however you end up loosing quite a lot of vertical resolution and detail through the conversion to polar co-ordinates (especially in the more important upper area of the original image). This means that you will want to start with as high a resolution original image as possible otherwise you will be severely limited in the potential output size of your little planet panosphere.
The Process:
1. Select an appropriate image (ideally – the bottom area (25%) and top area (25%) should have very little detail and the image should be much wider than tall (>= 2:1 aspect ratio))
2. Adjust the image so it looks it’s best before conversion if necessary
3. Level and Crop the image so that the horizon is straight (so the two ends will meet) and also that the left and right ends of the frame will match up relatively well when joined together
4. Rotate the image 180°: Image -> Image Rotation -> 180°
5. Convert to Polar Coordinates: Filter -> Distort -> Polar Coordinates (select the “Rectangular to Polar” setting) (Note: if you find the Distort filter option is not available you may need to convert your image from 16bit to 8bit first: Image -> Mode -> 8 Bits/Channel)
6. Squash the sides of the image in to make it a square image: Image -> Image Size -> Uncheck ‘Constrain Proportions’ and set the “Width” to the same value as your “Height”
7. Rotate the planet to your liking
8. The rest of the work is essentially image cleanup – cloning and fixing the join and the exposure around the join
9. You may also want to clean up the corner areas of the image where the software had to “invent” data during the conversion to polar coordinates (you’ll see diagonal lines fanning out to the corners). One technique for doing this is to add a radial blur: Duplicate the Layer, Filter -> Blue -> Radial Blur (Select Spin, Good and around 10 to 20%), Add an Inverted Mask to the layer and then paint in (using a White brush) the blurred region in the corners


September 18th, 2013 on 3:44 pm
Hi there! I hope you don’t mind but I decided to post your blog:
http://www.rc.au.net/blog/2013/05/22/panosphere-aka-little-planets/ to my internet directory website.
I used, “Panosphere” as your website headline.
I hope this is okay with you. If you’d like me to change
the title or perhaps remove it entirely, contact me at johnnieschreiner@gmail.com.
Thank you.