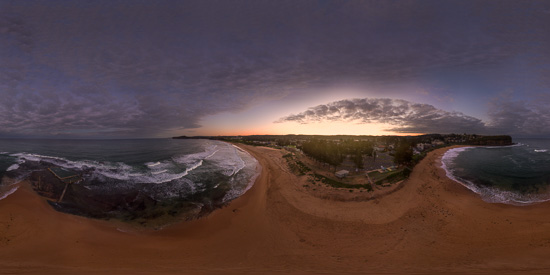
My 360˚ Panorama Workflow Part 1…
by Rodney Campbell on Jun.26, 2016, under Life, Photography
I’ve been posting a couple of interactive 360˚ panorama photographs both on my blog and my social media streams. Since then I’ve been asked a number of questions by various friends also interested in experimenting with this.
This series of blog posts is I guess an answer to a number of those questions and perhaps others they’ve not yet thought of :). It’s a description of my current 360˚ panorama workflow along with the tools and utilities I use.
Note: These photographs (especially the wider shots) look much better when larger. Click any of the images below to see larger versions in an inline overlay slideshow gallery viewer.
Taking the Source Images
There are a number of very good tutorials which describe what is required for taking source images for a stitched panorama. I won’t go over that in any detail here. I will however offer some key tips and cover a solution when using a drone.
General Panorama Tips
– ensure you overlap your source frames (I generally recommend 50% overlap but anything down to 25% should work).
– aim to lock your exposure before taking the frames. This is to ensure auto exposure doesn’t radically alter the exposure between frames. You may need to “hedge” your chosen exposure to choose an “average” exposure setting so as to not too badly overexpose the highlights in any particularly bright frames or totally block up the shadows in any darker frames.
– don’t use a polariser (because the polarisation will change between the frames in different directions to the light source).
– aim to keep your horizon level across the frames.
– if there are objects close to the camera you may be interested in avoiding parallax issues by rotating the camera & lens around the nodal point.
360˚ Panorama Tips
Your aim may be to create a full spherical photosphere (360 degrees x 180 degrees). This may be so you can have a full interactive panorama (i.e. one in which you can look in every direction from the central point with no gap in the view). If this is the case then your final photo is likely to be in equirectangular projection at a 2:1 landscape aspect ratio.
– you will likely be taking multiple rows of images to stitch (not just for the full 360˚ round view but also upwards and downwards).
Drone Tips
You can take 360˚ panorama images with a number of 360 specialised cameras. You can also take images with mobile devices and by stitching source frames taken with any normal camera.
It is also possible to take the source frames for a 360˚ panorama using a drone like the DJI Phantom and Inspire series. There are a number of software apps (run on your mobile or tablet devices) which can make this process easier.
I’ve been using the free DronePan app.
DronePan is simple. Fire up your transmitter and DJI drone as you normally would. Launch DronePan and use the FPV screen to get to your desired altitude. Then click the “Play” button. DronePan takes care of the rest.
DronePan will take all the necessary photos at the required yaw and pitch. This will create photos that can be easily stitched together for a 360 spherical panorama. The process takes less than 2 minutes.
Stitching the Panorama
There are a number of software applications available for stitching panorama’s. Way too many applications to cover here. This very extensive article which provides a comparison of photo stitching software is available should you want to research this aspect.
Some of the options I have tried or can recommend include Adobe Lightroom, Adobe Photoshop. There are also a host of specialist panorama stitching applications including PTGui, AutoPano, The Panorama Factory and Microsoft ICE
I wont go into the specific detail of using any of these packages. There will be many tutorials online on this extensive topic.
I will mention however a couple points to keep in mind:
– not all packages support stitching multi row full 360˚ panorama’s or using extremely wide angle (e.g. fisheye) lenses.
– if you are creating a 360 spherical panorama using a drone then you will discover that the drone is unable to take source images pointing upwards towards the higher parts of the sky nor the image pointing directly up at the zenith.
– if you wish to complete the full 2:1 equirectangular projection you will be up for some post processing. This includes “filling in” the sky at the top part of your image. Generally you’ll want to “fake” this upper portion of the image – either by extending/content aware filling/cloning in the existing sky or by dropping in a new sky from somewhere else.


