Archive for April, 2012
Darling Harbour Sunset/Twilight/Fireworks…
by Rodney Campbell on Apr.29, 2012, under Life, Photography
My local Camera Club had a meet over the weekend at Darling Harbour for dinner and some long exposure night photography (including a fireworks show). So about 20 keen photographers descended on Darling Harbour with cameras and tripods.
I arrived early so I could take some images of sunset and twilight before dinner and then we had a great evening of chatting and shooting which ended with fireworks and then ice cream 🙂
Note: These images (especially the wider shots) look much better when larger – so click any of the images below to see larger versions in an inline overlay slideshow gallery viewer.
The low sun was hitting the top of this curved glass building so I framed a telephoto shot with curves and lines to also include the crescent moon in the corner and here we have…
Cupping the Light
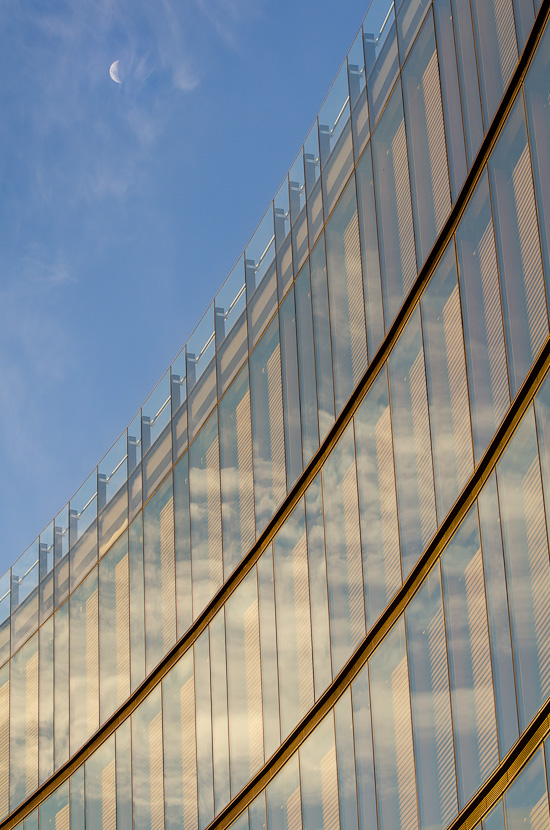
NIKON D7000 + 70.0-300.0 mm f/4.5-5.6 @ 70 mm, 1/200 sec at f/7.1, ISO 180
The sun set with fiery red clouds in the sky and I was setup on the city side of Darling Harbour looking across the just set sun with both a ten stop ND and 3 stop grad ND filters and a leisurely 6 minute exposure (and even that wasn’t enough) at f/5.6 (yes it was getting very dark 🙂 – in hindsight I should have upped the ISO a little)…
Red Shimmer
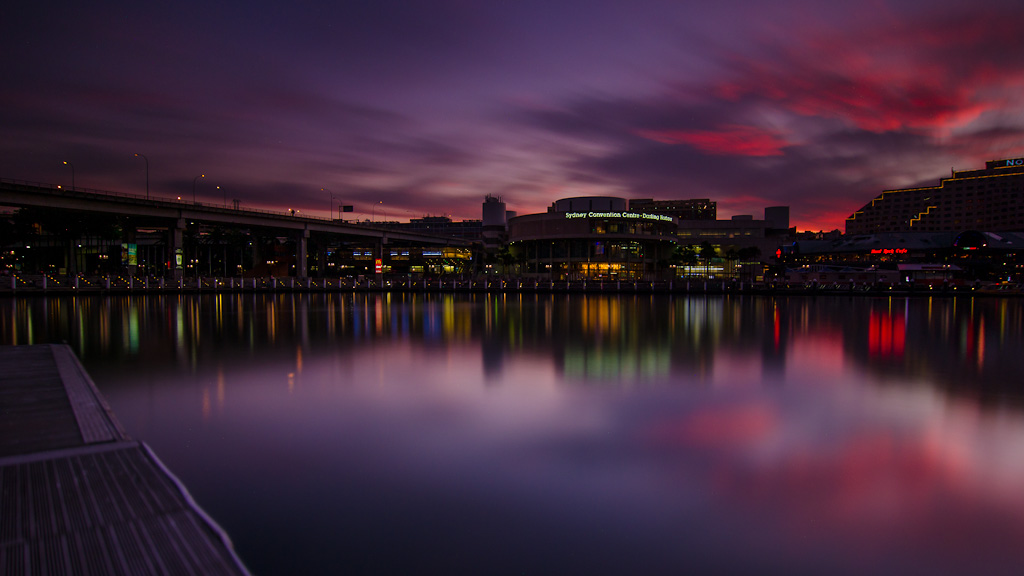
NIKON D7000 + 12.0-24.0 mm f/4.0 @ 14 mm, 359 sec at f/5.6, ISO 100
With it now being full twilight I removed the 10 stop ND and just used the grad for some nice blue twilight silky water reflections…
Including the moon in the top left corner (and it’s moving reflection bottom right) didn’t quite work (exposure was too long to have a distinct moon shape and it blew out)
Reflected Rows

NIKON D7000 + 12.0-24.0 mm f/4.0 @ 12 mm, 60 sec at f/11, ISO 100
The Blue Overpass
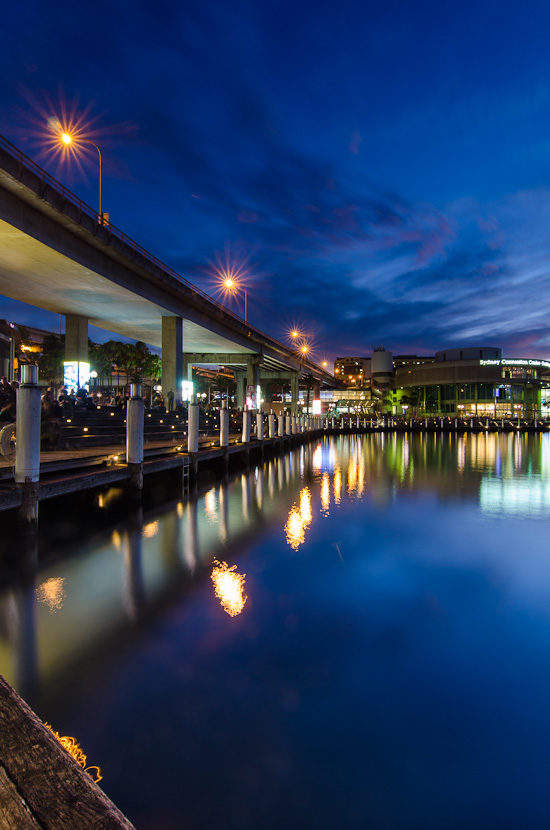
NIKON D7000 + 12.0-24.0 mm f/4.0 @ 12 mm, 53 sec at f/11, ISO 100
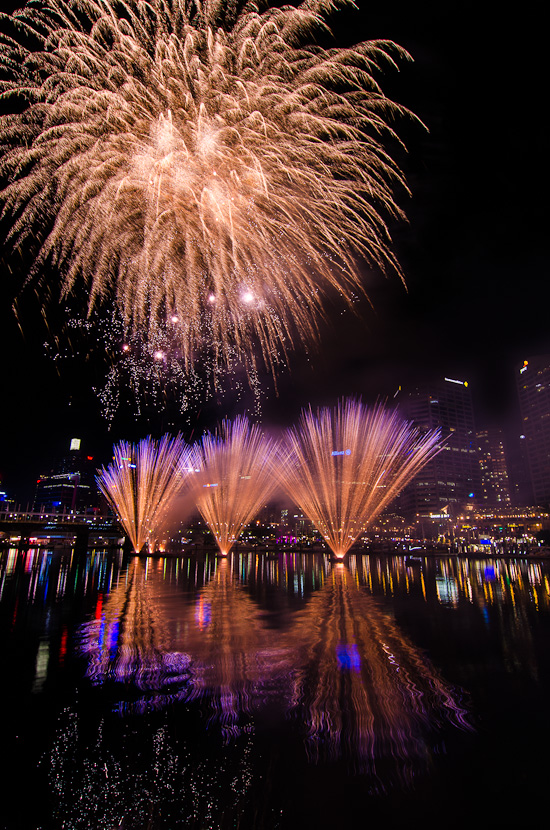
Later in the evening it was time to enjoy the fireworks (which are apparently on every second saturday night so I think I’ll take my girls down one evening for the show)
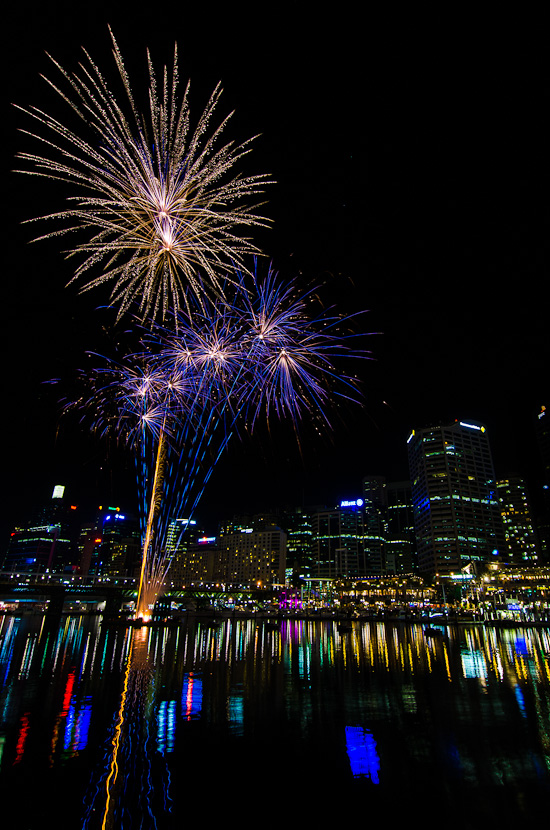
NIKON D7000 + 12.0-24.0 mm f/4.0 @ 12 mm, 4.3 sec at f/9, ISO 100
.
NIKON D7000 + 12.0-24.0 mm f/4.0 @ 12 mm, 5.3 sec at f/11, ISO 100
Star Trails over Central NSW – My First Startrails Attempt…
by Rodney Campbell on Apr.26, 2012, under Life, Photography
I’d long wanted to try creating a stacked star trails image but the light pollution in the city makes this a difficult proposition. My brother in law owns a farm in central New South Wales (out near Dubbo) and we visited for a few days during the Easter school holidays. Since we were staying on the farm I was hoping the opportunity to try some star trails would present itself.
Firstly what are Star Trails – in essence they are streaks of light left behind on the sensor or film from the stars as they travel across the sky in front of an open camera shutter. In fact, it only seems this way – in reality the stars are stationary and it’s the rotation of the earth that makes them appear to streak and spin.
Note: These images (especially the wider shots) look much better when larger – so click any of the images below to see larger versions in an inline overlay slideshow gallery viewer.
… OK first the end result in all it’s glory…
Reach for the Stars
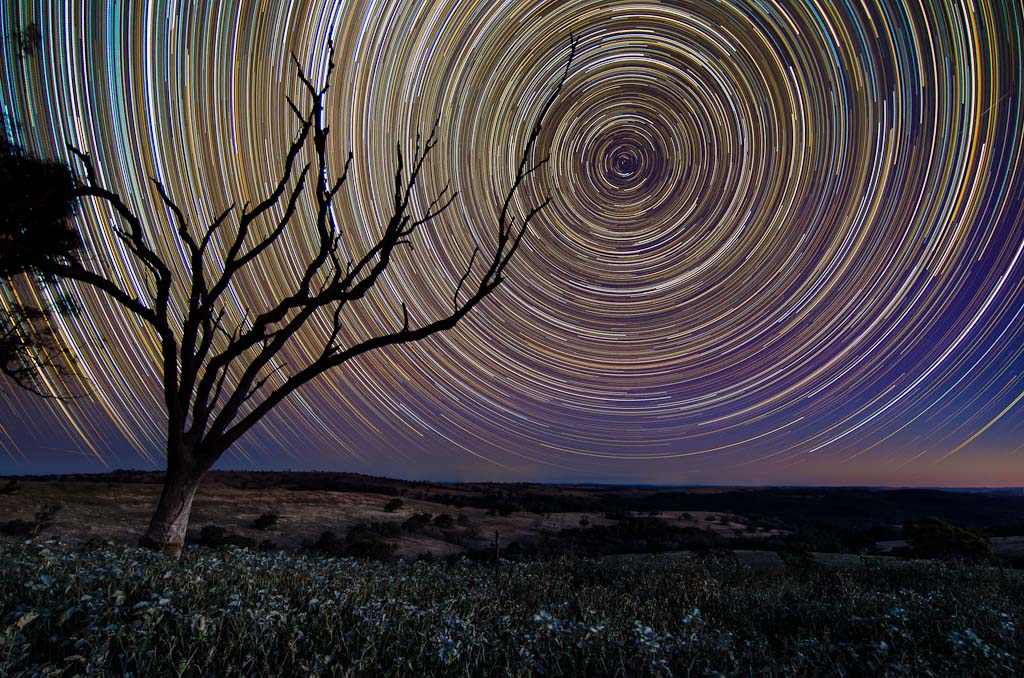
NIKON D7000 + 12.0-24.0 mm f/4.0 @ 12 mm, 60 sec at f/4, ISO 1250
Technical Details:
Nikon D7000 + Tokina 12-24mm f/4.0 Lens @ 12 mm
Twilight Image: 58 seconds at f/11, ISO 100
Star Trails Images: 210 x 60 second exposures (3.5 hours) at f/4.0, ISO 1250
For good star trails you need a couple environmental conditions:
– clear skies (clouds obscure the stars)
– minimal light pollution (lights from the ground shining up into the sky washing out all but the brightest stars – cities are bad)
– minimal moon (anything above about a quarter moon will both light the sky and obscure the stars (and overexpose the frame if it includes the moon))
As luck would have it the first night we were on the farm met these conditions – which was lucky since the nights which followed did not (very very cloudy).
We’d been driving for half the day to get there and we arrived late in the afternoon and by the time we got settled I only had a very short time to find a suitable location close to the farmhouse (within a few minutes walk) and setup my tripod before sunset.
I knew if I wanted to have the trails appear as a circular pattern around a central point in the sky I’d need to point roughly south (actually they spin around the Southern Celestial Pole (in the southern hemisphere)). So I found this old dead tree which would provide my foreground interest. Then I fired up an IOS (iPhone/iPad) app called SkySafari on my iPad so I could locate where Sigma Octantis (the closest thing to the southern pole star) was going to be in the sky and arranged the composition appropriately.
What do you need to take star trails:
– a camera (with the ability to specify manual settings and ideally with the ability to select a bulb mode for long exposures)
– a sturdy tripod
– a remote cable release (with an intervalometer function)
– you may want to keep the lens warm and protected to prevent dew formation (lens hood and I used some woollen socks wrapped around the lens)
– enough battery power (single large battery, spare batteries or battery grip) to last the desired number of frames (remember that batteries last less in the cold)
– a large enough memory card to hold all the images
– software to stack the resulting images (Photoshop, Startrails.de, DeepSkyStacker, StarStax, etc)
What is the technique/camera settings:
– lock your camera down on a tripod (I used a sand bag hanging from the centre column hook to weigh it down)
– set manual focus for the scene (on the foreground interest or about a third the way into the scene)
– take a suitable twilight image (this will form the basis of the non sky components of your final image) using normal landscape settings (aperture stopped down, low ISO, grad filters, etc)
– do not move the camera – change to star capturing settings:
– do NOT change focus
– put the camera in bulb mode
– wide open aperture (in my case it was f/4)
– higher ISO (I used ISO 1250) – aperture and ISO determine exposure for stars only
– daylight white balance
– select an appropriate shutter speed (in my case it was 60 seconds but something in the range of 30 to 120 seconds is likely the go) – shutter controls the ambient exposure – don’t overexpose the sky or any light pollution
– setup the intervalometer to take the number of continuous frames you need (in my case 60 second exposures with a one second interval between them)
– if you want lots of circles in the image you’ll need at least two and a half hours worth of images (in my case I had three and a half hours worth)
– start the sequence once the sky is completely dark
Once I’d started the star captures I actually left the camera in the paddock and went back to the farmhouse to wait it out in more comfort. My only concern was that some of the bulls might come over to where I’d put the tripod and knock it or worse still trample the camera, but the camera gods must have been smiling on me that night and all was good when I checked after the first hour and a half and then again at the end after three and a half hours.
What I hadn’t realised at the time was the town over the hills in the distance which was almost under the celestial pole which polluted the sky just above the horizon and also the highway over the ridge line in the distance which every now and then had headlights pointing my way – this all required a bit of post processing to fix (which I had to learn :)). Still I was very happy with the end result for my first attempt.
Also after I’d finished shooting the star trail interval shots I took some dark frame images (which I didn’t end up using) and I also took some single shot images of the stars in the sky.
To do this you basically just frame a composition pointing the camera up into the sky and use camera settings like:
– wide open aperture (in my case it was f/4)
– higher ISO (I used ISO 2500) – enough to expose the stars
– select an appropriate shutter speed – in this case you want a shutter speed slow enough to not have motion blur of the stars moving in the sky – the value is actually a factor of
– lens focal length (the longer the focal length the shorter the shutter needs to be since the relative motion of the stars is increased)
– direction you’re pointing at (the stars “move” slower closer to the celestial pole and faster further away)
– in my case I chose 25 seconds (but 15-30 seconds would be a good starting point)
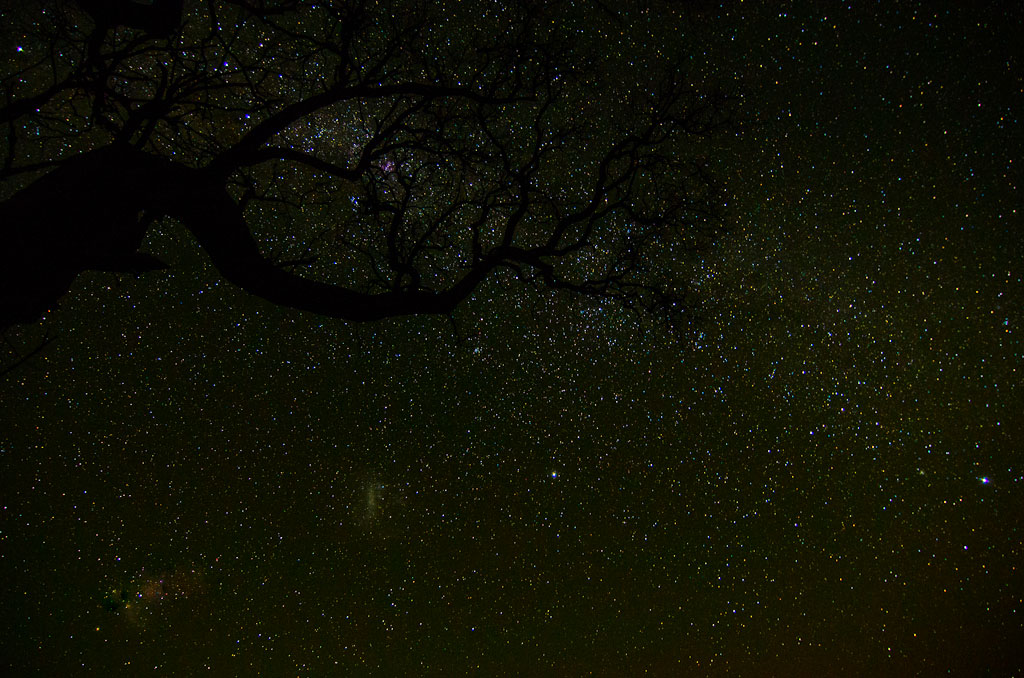
NIKON D7000 + 12.0-24.0 mm f/4.0 @ 12 mm, 25 sec at f/4, ISO 2500
Stacking the Images in Photoshop:
You can use Adobe Photoshop to stack your resulting images to create the main star trail image. The method for doing this is…
– Open Photoshop
– Go to Files -> Scripts -> Load Files into Stack…
– Do not tick the Attempt to Automatically Align Source Images box – the stars are often the dominant feature in these images so it may rotate all the images to make the stars line up and you’ll get no trails
– The files will load into a stack, each on a separate Layer
– Select the first image and set the Layer Blend mode to Lighten
– Right click that layer and select Copy Layer Style
– Click the second layer then shift click the last layer (selecting all the layers)
– Right click and select Paste Layer Style (this will set the Blend mode to Lighten for all layers)
– Flatten the image and Save it
– NB: When you stack a few hundred frames noise will also be eliminated
– NB: I did no PP at all to the NEFs before stacking (set the WB before starting to shoot the trails)
There are other ways to stack but this pretty fast (NB: there are Photoshop Actions you can download which automate this but there really isn’t much to it doing it manually). There’s also a method where every now and then you use Screen as the Layer Blend mode.
Stacking huge numbers of images will tax your computer and photoshop (because all the individual images are loaded into separate layers creating an enormous photoshop document). Stacking speed will depend on the size of your individual frames, the amount of RAM you have and the speed of your drive(s). I suggest stacking sub stacks of your images (with perhaps somewhere between 30 and 100 of your images at a time) flatten and save each sub stack and then stack all the resultant sub stacks at the end.
FYI: I started with stacking 40 images (as suggested by someone else with a Windows laptop with Core i7, 8GB RAM and SSD drive) and had no problems. I have a newish Macbook Pro (Core i7, 8GB RAM and SSD) and I ended up stacking over 100 Nikon D7000 NEFs (20MB each) at a time with no problems – perhaps Mac OSX is more efficient with this. NB: If you stack too many images and your machine starts paging/swapping to disk to cope with the virtual memory requirements your stacking time will go from 60 seconds to potentially hours.
… and here is a timelapse movie created from the star trails source frames:
Down on the Farm…
by Rodney Campbell on Apr.24, 2012, under Life, Photography
Whilst visiting a relatives farm recently I spent some time wandering about taking photos…
Note: These images (especially the wider shots) look much better when larger – so click any of the images below to see larger versions in an inline overlay slideshow gallery viewer.
Tractor
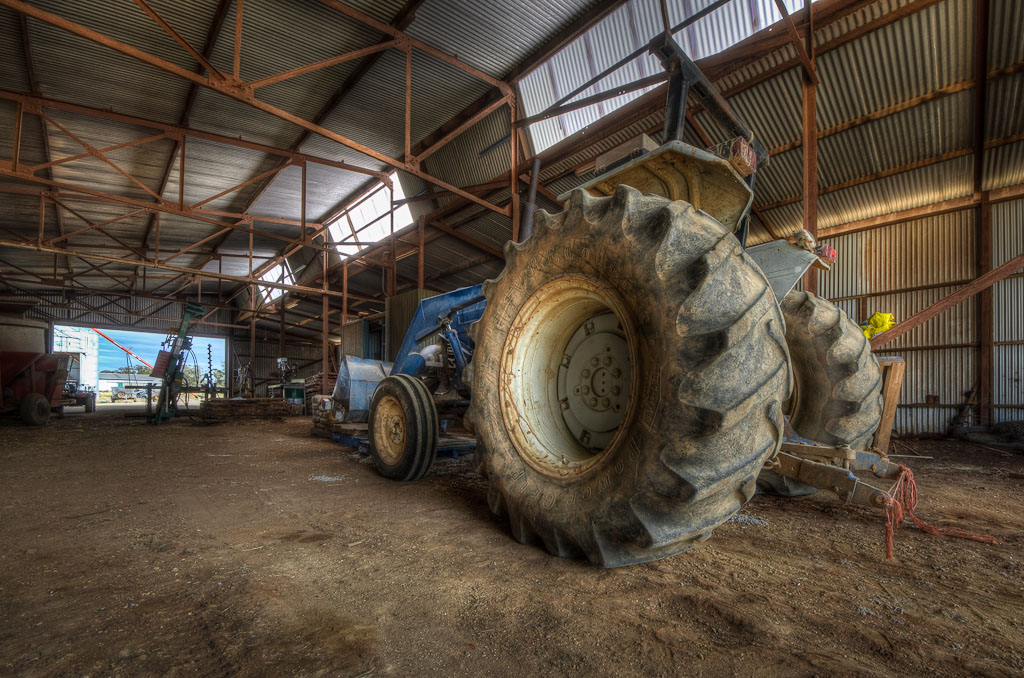
NIKON D7000 + 8.0-16.0 mm f/4.5-5.6 @ 8 mm, 1/20 sec at f/11, ISO 100
Farmers Best…
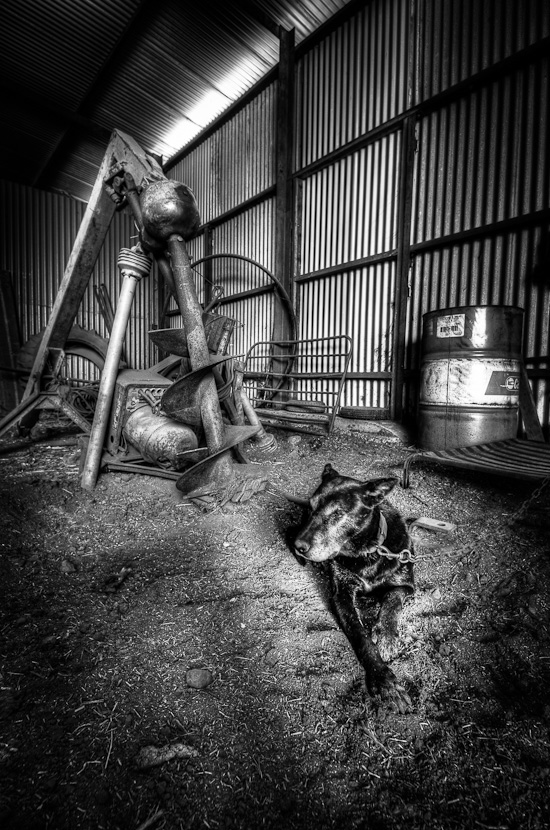
NIKON D7000 + 8.0-16.0 mm f/4.5-5.6 @ 11.5 mm, 1 sec at f/5.6, ISO 100
Decay
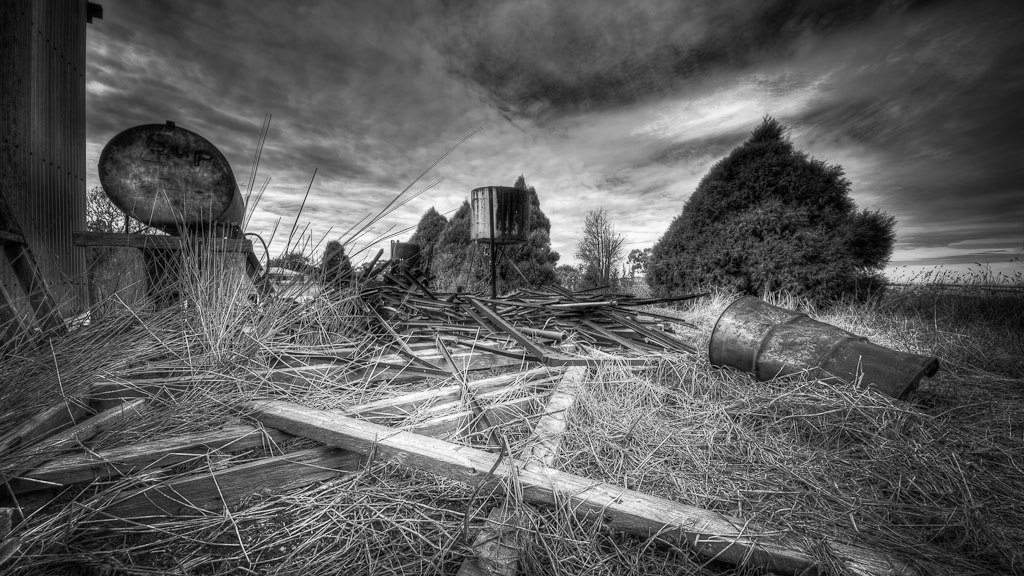
NIKON D7000 + 8.0-16.0 mm f/4.5-5.6 @ 8 mm, 1/50 sec at f/11, ISO 100
Who’s Looking at You
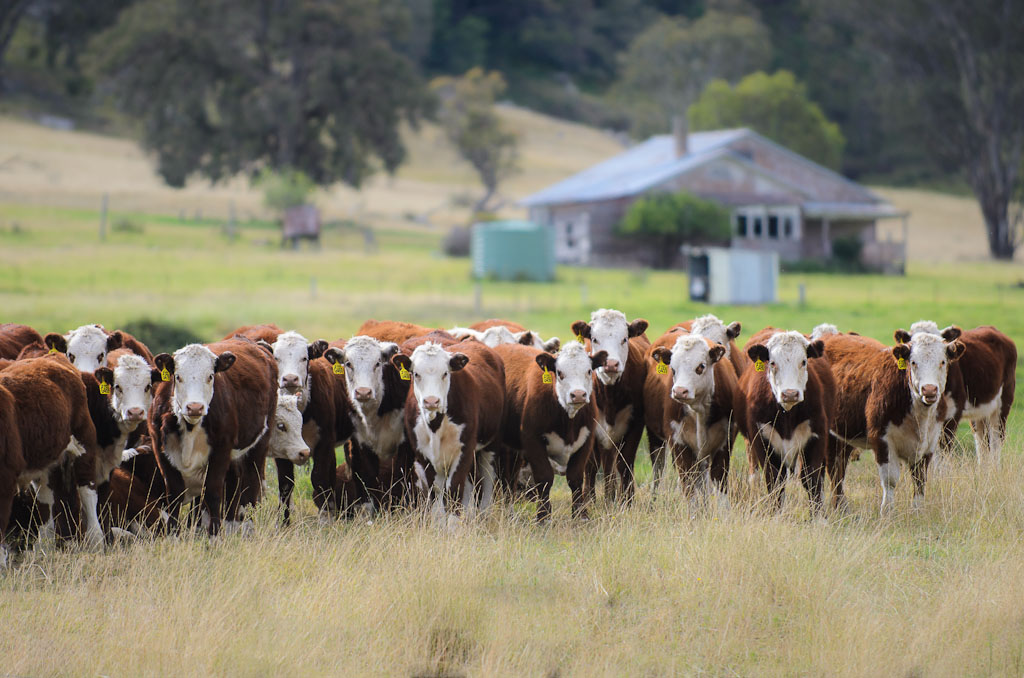
NIKON D7000 + 70.0-200.0 mm f/2.8 @ 200 mm, 1/250 sec at f/2.8, ISO 100
Blues Point Sunset…
by Rodney Campbell on Apr.22, 2012, under Life, Photography
Spent a happy pre sunset meal, followed by sunset and twilight with a number of other like minded photographers at Blues Point on Sydney Harbour.
Note: These images (especially the wider shots) look much better when larger – so click any of the images below to see larger versions in an inline overlay slideshow gallery viewer.
Pre Sunset with 10 Stop ND and a 0.9 GND filters pointing towards the setting sun
NIKON D7000 + 12.0-24.0 mm f/4.0 @ 13 mm, 120 sec at f/9, ISO 100
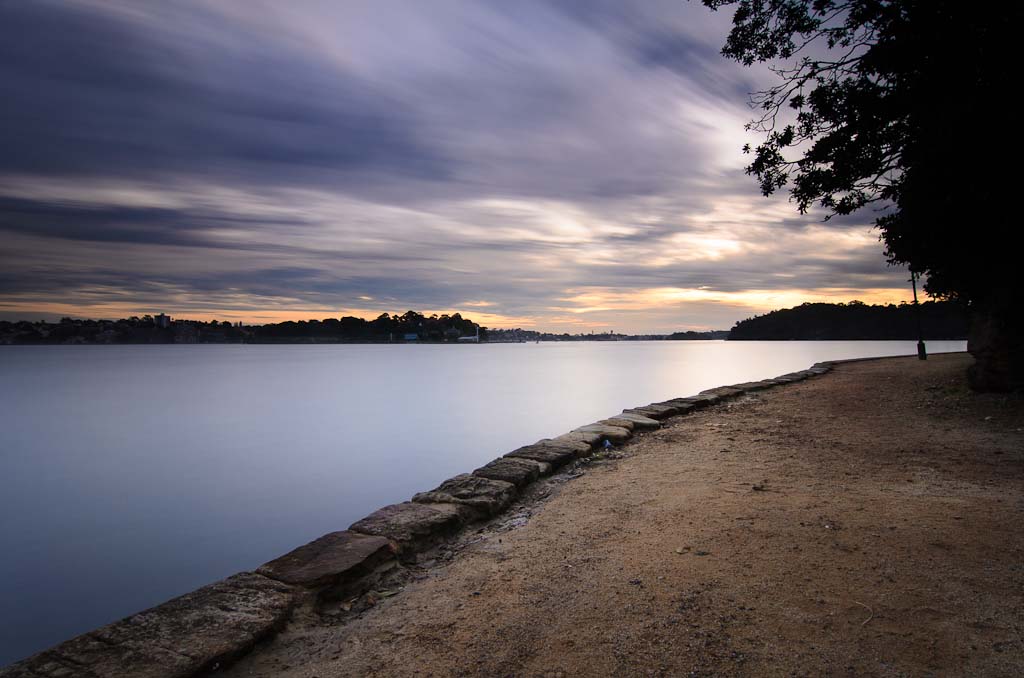
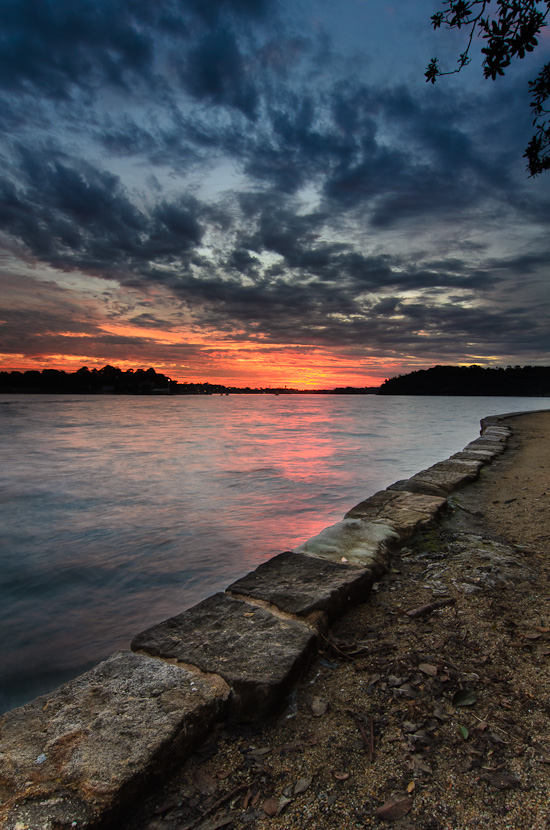
During sunset pointing away from the sun (towards the Opera House and the coathanger) again with 10 Stop ND and a 0.9 GND filters – a three and a half minute exposure to get some interesting water and sky effects – my favourite shot of the evening

NIKON D7000 + 12.0-24.0 mm f/4.0 @ 14 mm, 211 sec at f/5.6, ISO 400
Which unfortunately meant I missed most of sunset in the other direction – here’s the trailing edge
NIKON D7000 + 12.0-24.0 mm f/4.0 @ 14 mm, 1.3 sec at f/16, ISO 400
and lastly back towards Luna Park, SHB and SOH for the obligatory twilight long exposure – we’re definitely at “Blues” Point…
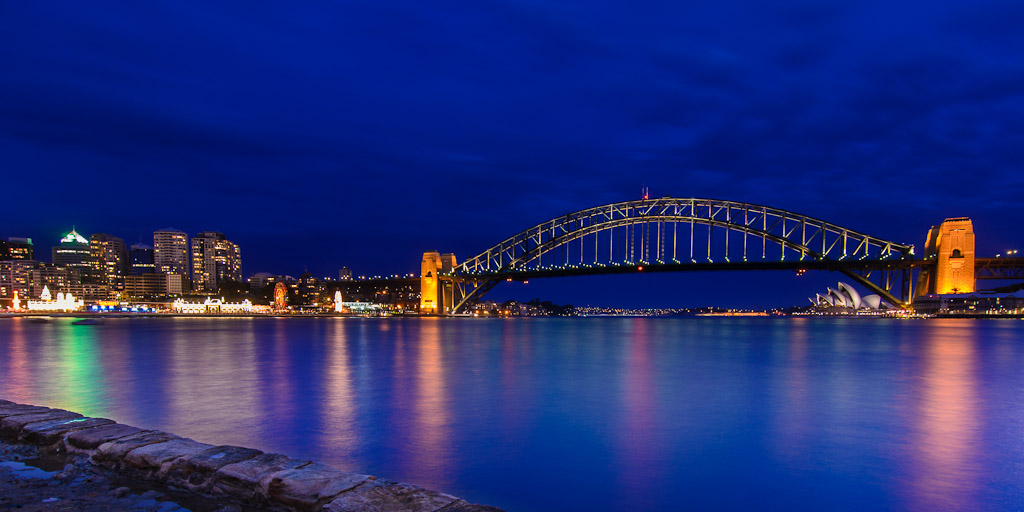
NIKON D7000 + 12.0-24.0 mm f/4.0 @ 12 mm, 60 sec at f/8, ISO 200
Light Painting Stravaganza @ Middle Head Fort – Part II…
by Rodney Campbell on Apr.18, 2012, under Life, Photography
Light Painting Stravaganza @ Middle Head Fort – Part II – Steel Wool…
After our experiments with all manner of battery powered light we moved onto experimenting with burning steel wool. We started with the very very fine (0000) grade stuff indoors and moved onto the coarser medium grade stuff outdoors for some epic spins (thanks Gerry :))
Note: These images (especially the wider shots) look much better when larger – so click any of the images below to see larger versions in an inline overlay slideshow gallery viewer.
In one of the small tunnels with lots of interesting textures and features inside we tried a combination of blue EL wire and spinning wool
Spiral – 225 second exposure (12mm @ f/8 @ ISO 100)
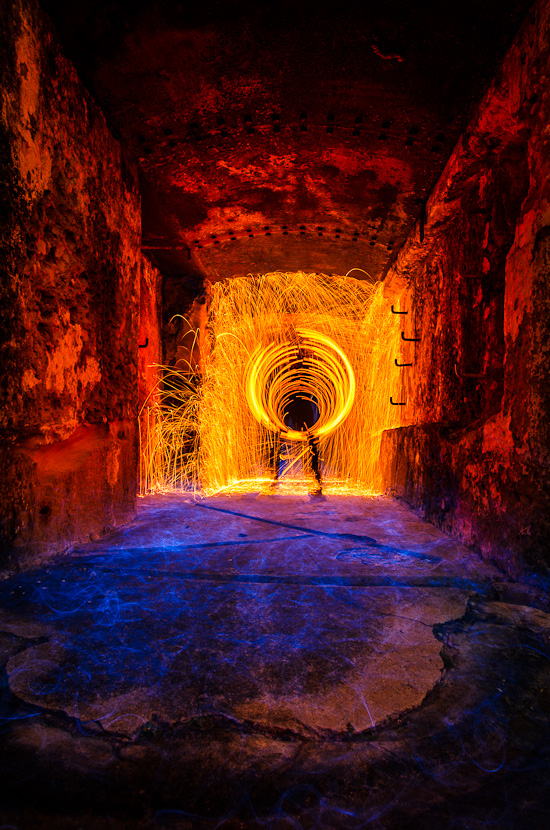
NIKON D7000 + 12.0-24.0 mm f/4.0 @ 12 mm, 225 sec at f/8, ISO 100
We moved to another room where we could spin into the room from a side corridor and photograph from within the room, I also switched up to my ‘ultra’ ultra wide so I could go out to 8mm and go huge!
Steel Works – 24 second exposure (8mm @ f/8 @ ISO 100)
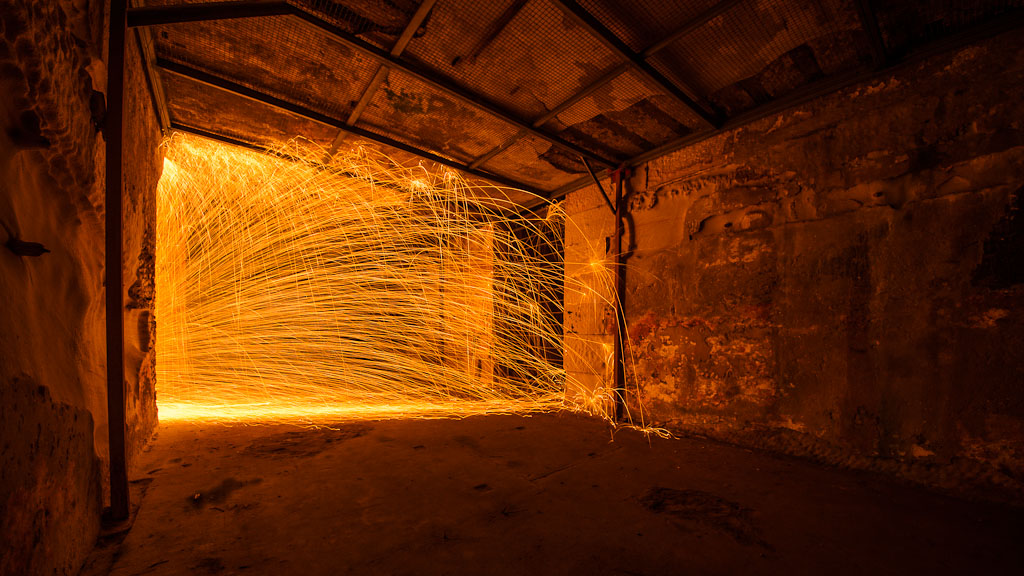
NIKON D7000 + 8.0-16.0 mm f/4.5-5.6 @ 8 mm, 24 sec at f/8, ISO 100
Then we moved back outdoors to finish of the evening with some huge spins in the open area where we did the dome earlier
Spider – 16 second exposure (8mm @ f/8 @ ISO 100)
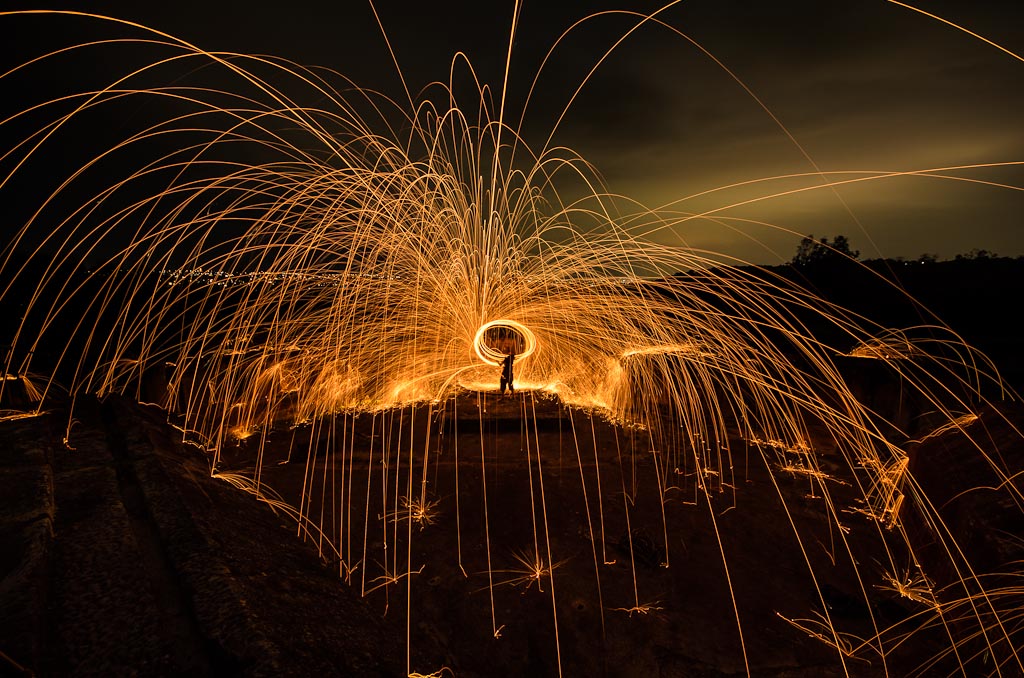
NIKON D7000 + 8.0-16.0 mm f/4.5-5.6 @ 8 mm, 24 sec at f/8, ISO 100
Reign of Fire – 24 second exposure (8mm @ f/8 @ ISO 100) – at which point we were considering the sanity of being bombarded with flaming pieces of metal… go hard or go home I reckon 🙂
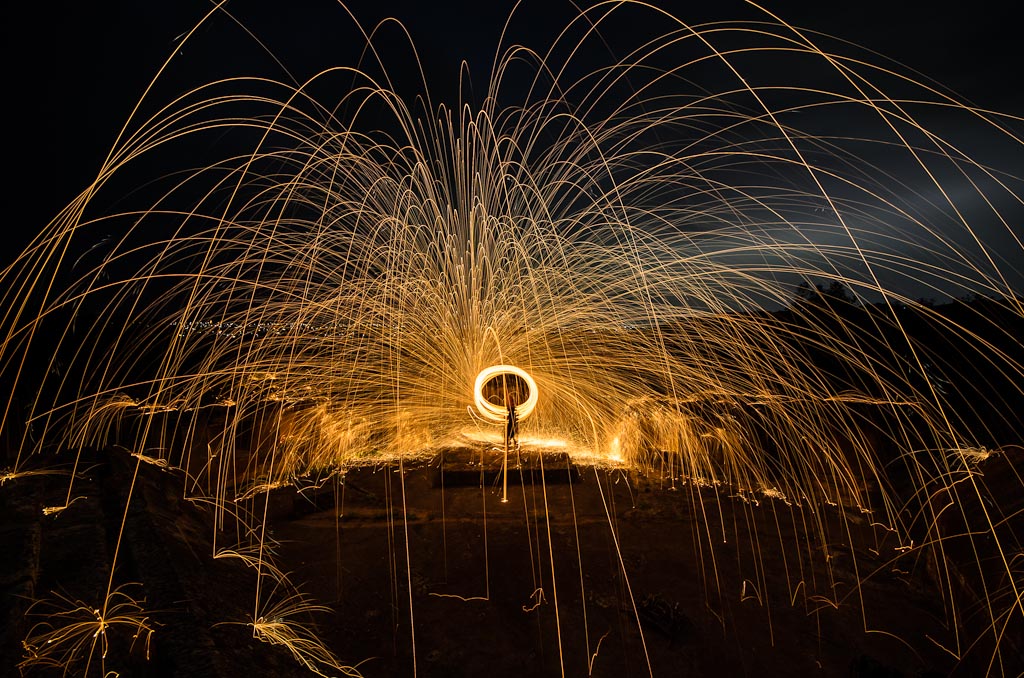
NIKON D7000 + 8.0-16.0 mm f/4.5-5.6 @ 8 mm, 16 sec at f/8, ISO 100
One of the definite advantages of a light painting session is that since it takes literally minutes (10) to both setup and take each shot, there are relatively few shots to post process when you get home – I had less than 50 shots for the whole evening 🙂
A huge thanks to Kath for instigating and organising the shoot and for doing so much prior research and bringing an awesome level of goodies for the evening – I don’t think we even got to using over half of it – more fuel for a future session I reckon 🙂
-
Hi! Welcome to Rodney Campbell's Blog!
Thanks for dropping by! Feel free to join the discussion by leaving comments, and stay updated by subscribing to the RSS feed. See ya around!
Follow Me!


