Archive for December, 2018
Leofoto Ranger Series LS-365C – First Look…
by Rodney Campbell on Dec.31, 2018, under Life, Photography
I’ve just bought myself a late Christmas present – the Leofoto Ranger Series LS-365C tripod

I’ve had my Sirui N2204 now for over seven (7) years and it was getting a little worse for wear
It was and still is quite a good tripod. However through many years of heavy use and some neglect it’s not what it once was. The leg locks were no longer smooth and reliable as they once were. However more importantly the little lever things at the top of each leg which allow you to ratchet and angle the legs up was basically unusable. It also had one other design flaw. The rubber feet which are supposed to allow you to deploy the twist-out metal spikes. Essentially the rubber ring would decay and gum up almost immediately through normal use and would stop working. After a few months you could no longer deploy the spikes at all
My shooting buddy Gerry convinced me of the merits of moving over to a new up and coming tripod brand. He also recently made the switch from his Sirui N2204 (which he actively disliked) to a Leofoto. In his case he moved to a custom Leofoto Armor Series LN-284CT. The customisations to his model involved extra long leg sections which significantly raised the maximum height of the tripod. This is very necessary for someone like Gerry who is ridiculously tall :). Essentially these customisations made the tripod roughly the same height as the Sirui when extended. That is roughly 135cm (without extending the centre column) – compared to say the standard LN-284CT at 125cm
I (like many photographers I expect) have a couple essential criteria for choosing my tripod legs. This is based on actual usability over many years travelling and in the field. Looking at things I actually use and need day in, day out
Maximum height without extending a centre column
– you want a tripod so that when raised with the camera on the ballhead it can reach your standing (eye) height. You do not want to be constantly bending over and holding uncomfortable positions to look through the viewfinder
– in my case for my height – 135cm from the ground to the top of the plate where the ballhead sits is about the minimum. My Really Right Stuff BH-40 PCLR adds another 64mm on top of that. Then the L bracket and camera sits on top of that
– basically you don’t want to have to extend a centre column. This is because the camera becomes significantly less stable. You’ve bought and are using a tripod for it’s stability – why compromise that
Stability
– essentially if it’s not stable what is the point
– this normally just comes down to things like the thickness of the leg sections, whether there is a centre column or not and how long it is, stability of the central yoke where the legs join (where the centre column goes through) and the head sits, the number of leg sections, and the materials used (e.g. aluminium vs carbon fibre)
Compactness when folded
– this just makes it easier to carry and travel with – the shorter it is the easier it is to carry on the camera backpack, in a backpack or in any luggage
– my Sirui was 53cm folded (plus the ballhead on top of that) – yes it can be reverse folded down to 46cm but I never did that. Too time consuming and cumbersome to do it out in the field. Plus my leg angle lever releases no longer worked anyway
Weight
– if it’s too heavy you won’t want to carry it – the Sirui was extremely light for it’s size at 1.5kg
– you generally have to compromise weight vs things like size, stability, height and cost
With my Sirui I always had the included short centre column on my tripod. This meant I would never extend the tripod to additional height (as it only allowed perhaps a cm or two of extension). It also permitted me to drop the height of the tripod to very low levels (in the case of the Sirui down to 17cm). I’ve used this low height shooting position on many occasions. It’s another feature I desire – something you can’t easily do with a long centre column (as it gets in the way when you splay the legs out)
So I looked at all the Leofoto options and only a couple even came close to meeting most of my requirements
Gerry’s custom LN-284CT would have been an option with an (optional) short centre column for me. Unfortunately it was a one off never to be repeated special 🙁
The next model up – the LN-324CT went to 134cm, with thicker leg sections but was a hefty 2.1kg and 60cm folded
Besides looking at the Armor series I also looked at various Hiker and Mountain series models and the Ranger series. Most were either too short or too heavy (or both)
In the end after reviewing many models I opted to go for a systematic style tripod (no centre column at all)
The Leofoto Ranger Series LS-365C gives me just about everything I wanted
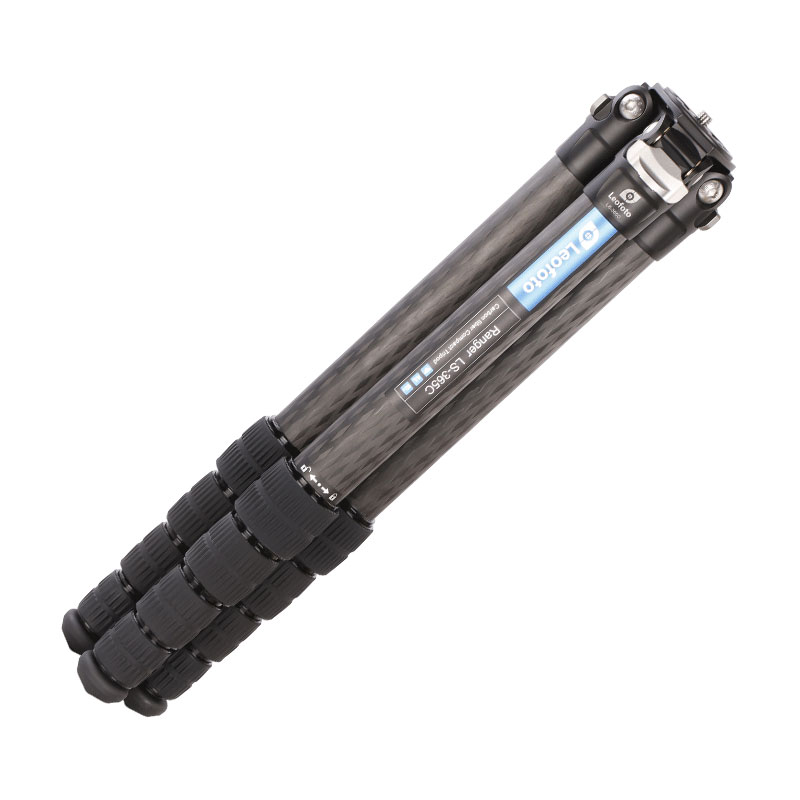
It’s massive 152cm height when extended far surpasses my existing Sirui (by 17cm!) – in fact at maximum height the camera can be well above my head. Useful for those few times when I really needed a really high tripod – e.g. when shooting over something high (like a wall) or on very sloped ground
With very large leg sections (36/32/28/25/22mm) it’s actually much beefier than my Sirui (with 28/25/22/19mm sections). It’s actually beefier than I wanted or needed. I would have been happy with a next model down (e.g. something like 32/28/25/22/19mm (LS-265C)) but alas no such model exists
One major compromise here is that it is a 5 leg section tripod. Unlike my Sirui or most other competing options which have four leg sections
Typically 5 section tripods are reserved for very light and spindly travel tripods. I also have one of those in the MeFOTO C1350 Roadtrip. It has very tiny thin legs and is extremely compact folded but extends quite high and weighs just 1.4kg. But this dramatically compromises stability. I’m hoping the massively oversized leg sections of the LS-365C will make up for any 5 leg section stability issues. It certainly seems to – it appears rock solid when fully extended
The Leofoto’s also have larger oversized twist leg locks, much more robust than on the Sirui. This also likely adds to the overall stability of the tripod
With no centre column at all and the 5 leg sections it’s very compact when folded. Just 48cm (which is (5cm) less than my Sirui). It also allows the tripod to drop down incredibly low with the legs spayed out wide – a tiny 8cm which also bests my old Sirui (by 9cm)
One area where I did have to compromise was weight – it’s 1.77kg which is a little heavier than my old Sirui (by almost 280g). But it’s much less than some of the other competing options at around 2.5kg. Hopefully it’s enhancements in almost every other facet will make up for this. Only time will tell
I’ll report back with a full review when I’ve have a much better chance to use it for an extended time
A Loo with a View
by Rodney Campbell on Dec.27, 2018, under Life, Photography
I’d already had a fantastic day shooting these amazing gorges and natural beauty here at Dales. Still there was no time for sleeping – with such spectacular opportunities on offer how could I let any chance slip by
Moonrise wasn’t till 9:37PM tonight and we were so soo sooo out in remote dark skies territory here. No time for shooting star trails yet but some static milky way action was on offer. I didn’t have the energy to do something spectacular (or crazy) like shooting stars from within one of the gorges. However I could forgo sleeping just a little and step outside and shoot from next to the van 🙂
The milky way was almost vertical in the sky at this time (of year and time of night) and the galactic core was almost directly above us. I wanted to do another arch of stars over… something… but it was going to be incredibly difficult.
A Loo with a View

NIKON D750 + 14.0 mm f/2.8 @ 14 mm, 30 sec at f/2.8, ISO 8000 x 6 Frames
Note: These photographs (especially the wider shots) look much better when larger. To see larger versions in an inline overlay slideshow gallery viewer click any of the images.
I took some vertical frames for a horizontal archway of stars (over the only thing I had in the clearing near us – the loo building :)). My aim was for the loo to be in the centre with the arch going high overhead and I’d call it “A Loo with a View” 🙂
Alas I took these frames like I’ve done most of these off horizontal panoramas with the 14mm. By hand and by eye – guessing the actual framing and overlap. Finally my luck ran out – I’d been doing so well so far. I think when I took the frames at the time I had an inkling they weren’t going to work properly.
The six source frames didn’t successfully stitch properly. They also didn’t really extend up far enough to cover the top of the arch properly in all but the centre frame.
Flash forward 3+ years and Lightroom still couldn’t deal with the frames. However the new Photoshop has done a better (albeit pretty horrible) result. I’ve had to drastically massage the resultant stitch and lost most of the resolution. It’s at least somewhat presentable now tho 🙂
Blood Rain
by Rodney Campbell on Dec.24, 2018, under Life, Photography
In my previous post I showed the result of blending the stacked 123 star trail frames with a more sombre blue light painted frame
Here we have the same result also blended with deep blood red lighting instead for a completely different mood
Blood Rain

NIKON D750 + 24.0-70.0 mm f/2.8 @ 24 mm, 51 sec at f/2.8, ISO 800 x 123 Frames
Note: These photographs (especially the wider shots) look much better when larger. To see larger versions in an inline overlay slideshow gallery viewer click any of the images.
The Cave and the Stars
by Rodney Campbell on Dec.20, 2018, under Life, Photography
I’d previously shot from within this cave almost five (5) years ago. However it was the one and only time I’d shot here at Cathedral Rocks near Kiama
There are two main draw cards at this location. Firstly the rocks spires out in the ocean just off the coast. Secondly this fabulous little cave with a water channel snaking it’s way into the cave
I have a long exposure photo looking out from within the cave shot before sunrise hanging up in my hallway at home. My daughter having seen this often was very keen to shoot at this location. As we were doing night/star trails shoots I thought this would be a distinctly unusual take on the location. Looking out from the cave with star trails in the sky
However the tide and swell conditions are definitely something to consider when shooting at Cathedral Rocks. Access to some of the best spots like the cave and in between the two main rock stacks, is really only possible at low tide. Unless you are willing to get very wet or risk drowning inside the cave 🙁
Checking out the tide times we found that there was a high mid tide at around 9:30PM which was about an hour and a half after sunset. We figured we’d take a punt and arrive approximately on sunset. If the water inside the cave wasn’t too high around that time it should hopefully not rise too much more. Plus after it got dark enough to start the trails (around the peak of the mid tide) it would only drop after that
Seeking the Stars

NIKON D750 + 24.0-70.0 mm f/2.8 @ 24 mm, 64 sec at f/2.8, ISO 800
Note: These photographs (especially the wider shots) look much better when larger. To see larger versions in an inline overlay slideshow gallery viewer click any of the images.
Once onsite we appeared to be in luck – the water was definitely inside the mouth of the cave but the higher area at the back of the cave was dry
We spent the next hour and a bit doing some preparatory shots. Refining our compositions and taking some test shots. Then doing some light painting exposures. Finally some shots with ourselves shining our headlamps into the sky for scale. All of which we could later blend with our star trails
Besides lighting the inside of the cave and the rock channel with warm white and various coloured light. We also did an EL wire shot (unfortunately I stepped into a deep water hole in the rocks in the dark) so one was definitely enough 🙂
One thing you may note here is that instead of using my typical 12mm or 14mm for shooting the stars I’ve chosen instead to use a longer 24mm focal length. The main purpose of which was to keep the rock pillar and people in the frame relatively larger
The Beacon

NIKON D750 + 24.0-70.0 mm f/2.8 @ 24 mm, 51 sec at f/2.8, ISO 800 x 123 Frames
At 9:30PM it was dark enough to start the trails exposures. Most importantly it was high mid tide so hopefully we were seeing the peak of the waves. However every now and then an unusually high rogue wave would surge in and come partway up the tripod legs 🙂
We then waited inside the back of the cave for our shots to run. Normally I’d aim to shoot for about two hours worth of rotation. Unfortunately just before 11:15PM another photographer who’d been shooting further around was coming back and into the cave. A bright headlight shining into our camera’s and that was that – end of the evening. Thankfully we were only about 15 minutes short of the two hours so no big deal

NIKON D750 + 24.0-70.0 mm f/2.8 @ 24 mm, 51.00 sec at f/2.8, ISO 800
Stacking the 123 x 51 second frames and then blended with a few our of preliminary light painting and setup shots we have our final result
Infinite Worlds, Infinite Possibilities
by Rodney Campbell on Dec.17, 2018, under Life, Photography
In my previous post I showed the result of blending the stacked 239 star trail frames with some of the more natural light (warm daylight) light painting frames
Here we have the same result also blended with one of the steel wool spins for a different spin (no pun intended) on things
Infinite Worlds

NIKON D750 + 12.0 mm f/2.8 @ 12 mm, 36 sec at f/2.8, ISO 800 x 239 Frames
Note: These photographs (especially the wider shots) look much better when larger. To see larger versions in an inline overlay slideshow gallery viewer click any of the images.
and for something a bit more crazy here it is blended with the rocks and water light painted in red
Star Carnage

NIKON D750 + 12.0 mm f/2.8 @ 12 mm, 36 sec at f/2.8, ISO 800 x 239 Frames
I personally prefer the original shot with just the simple warm light. It’s less busy and well… simpler. Though I am a little partial to this striking red version and the way I was able to do the lighting. However I would be very interested to see what the general public thinks – which do you prefer?
Blue Poles

NIKON D750 + 12.0 mm f/2.8 @ 12 mm, 36 sec at f/2.8, ISO 800 x 239 Frames
-
Hi! Welcome to Rodney Campbell's Blog!
Thanks for dropping by! Feel free to join the discussion by leaving comments, and stay updated by subscribing to the RSS feed. See ya around!
Follow Me!


