Archive for June, 2019
Lens Design and Software Corrections
by Rodney Campbell on Jun.24, 2019, under Life, Photography
One of the “issues” raging on the Internet today concerns the use of lens designs that “require” the use of software corrections (in camera and/or in post) to “correct” the lens output
Lens corrections in software aren’t new. They’ve been around in software post processing packages to correct things like chromatic aberration, vignetting and distortion for ages. Typically however whether you apply these corrections or not, or to what degree, is entirely at the users discretion
What is new is that modern manufacturers of cameras and lenses are “baking in” and “relying” on these software corrections as part of the design process. Ultimately leading to them having to do less work in trying to do the corrections in the optical lens design itself. Whilst expecting that part of the work is done by the software correction that follows. This presumably allows for smaller, lighter, cheaper lens designs that don’t need as large and as complex systems inside the lens to deal with the issues
This has mostly been brought on by the new Mirrorless (D-SLR, etc, replacement) systems with their goal of smaller and lighter
So why does this matter …
Well in two ways …
The “purists” say this should all be done in the lens and they want to decide what post processing software based activities occur. When they read lens reviews comparing two or more lenses they “only” want to compare the underlying raw optical data
Secondly…
We have on one side, lens review sites that are reviewing the “newer breed” of lenses. But doing so in the same way as the traditional lens designs. i.e. photographing test charts, but ignoring the manufacturer intended software corrections when analysing the data and scoring. Possibly resulting in some level of poor performance (especially for wider lenses where things are trickier)
On the other side we have the owners and users of said lenses complaining that the test charts and “scores” are not indicative of what they are seeing in real world use. Their in the field results appear to be much “higher” than what this would indicate. Including against other lenses which in theory “score” much higher
A controversial view … Lets try this sequence of events …
In the good old days lenses were designed “proper”. You attached them to a camera (film or digital) and shot with them and WYSIWYG (What You See Is What You Got)
What I mean by this is…
A lens projects a circular imaging area at the back of the lens. Typically if designed properly this circle is larger than the sensor (film or digital sensor) it’s designed to project over. The sensor “crops” out a rectangular area of this projected view. Lens designers design for this – they don’t expect the area outside of the sensor borders to be used – even though the lens does of course project there
So now first question – when “you” “score/rate” lenses do you score the circular projection area or what the lens designer designed for – the rectangular sensor crop area?
On a “traditional” camera (film or D-SLR say (or even digital P&S)). If you had a 100% coverage optical viewfinder or use liveview on the back LCD screen of digital to compose an image you’d expect the resultant image to represent exactly what you framed and composed. If you placed an object at the exact corner of the frame, or multiple objects at exact positions in the frame – thats exactly where they were in the resultant image. If you composed for something to be excluded from the frame – it would be. i.e. it was WYSIWYG
No matter what lens you attached – the view you saw through the viewfinder or liveview is what you got in the final image. Nothing cropped off or nothing outside of the frame. In fact if you had a less than 100% optical viewfinder you the photographer had to factor this in and include less in your frame to cater for the fact that the final image was going to include more. Or you cropped the final image in post
Note: This only applies if you did NOT apply any post/software lens corrections. In this case if you apply “aftermarket” lens corrections you may find that distortion correction controls move parts of your intended composition outside the frame (i.e. cropped out). Which is I suspect why many people don’t want to apply lens correction profiles in some instances and mess up their carefully crafted WYSIWYG composition
So again I ask – do you score/rate this lens based on the projected imaging circle or what both the lens designer and “you” the photographer actually exactly intended/composed for in the viewfinder or on liveview?
Today we come to new lens designs with designed in software corrections. In this case the designer expects these corrections to take place. In fact has an intended lens design that typically goes outside the expected final image. Much like the projected imaging circle above. This is because they expect their software corrections to counteract lens distortion and thus crop or move parts of the image (especially at the extremes/borders/corners of the frame). So the optical lens design might include some extra area around the “advertised” FOV (e.g. a 14mm lens might actually be more like 13mm in reality). Fully intending that when software corrections are applied it gets cropped down to the desired frame/FOV
Let’s take a system like my Nikon Z mirrorless camera with a Nikkor Z lens attached. When you look through the viewfinder or compose using the rear LCD you are seeing the view WITH these anticipated/designed lens manufacturer software corrections being applied. i.e. it is designed to be WYSIWYG. You can compose your scene as you desire with things exactly along the edges or right at a corner and fully expect it will be there in the final image. Likewise compose to exclude things from outside the frame and they won’t be there in the final image as intended
That is… if you purposely DON’T apply the manufacturer designed software corrections, then your carefully composed scene MAY NOT match the image you get. If however you DO apply the software corrections, your composed scene WILL match the image you get in post. In the case of the Z system the “baked” in software corrections are automatically applied by a number of popular image software applications (e.g. Adobe)
You can of course load the raw image files into software which does not do these intended software corrections. This includes imaging/lens testbed systems. However what you may get is data around the sides of the image that the lens designer, and in fact you the photographer, never intended to be seen or used
So finally I ask – do you score/rate this lens based on the projected area of the lens or what both the lens designer and “you” the photographer actually exactly intended/composed for in the viewfinder or on liveview?
SkyWatcher Star Adventurer Mini – First Look
by Rodney Campbell on Jun.17, 2019, under Life, Photography
Photographing the milky way and the stars above at night is often a technical battle against the limitations of very little light
Most of the stars in the night sky are very dim and thus astrophotography is literally a race against time to capture as much starlight as possible before star trailing sets in. The trailing of stars in an image is induced because of the rotation of the earth causing the stars to appear to be moving across the sky during an exposure
Typically the aim is to have nice point stars in an image and not little lines and arcs of varied length. Unless that is, the goal is to create a star trails photograph
There are essentially three in camera tools in a photographers toolbox to combat the issue of very dim stars and minimal light:
- Aperture – the wider/larger the aperture the more light will be allowed through to hit your camera sensor. This typically means the use of fast lenses with large maximum apertures like f/2.8, f/2.4, f/2, f/1.8 or f/1.4. However there are also typically negative consequences to faster lenses (other than just cost, size and weight). Faster lenses often have increased lens aberrations which negatively affect images of stars. e.g. coma, chromatic aberration, spherical aberration, astigmatism, etc. Stars should typically represent as point sources of light so aberrations which distort the shape, sharpness and edges of these point stars is more noticeable in astrophotography
- ISO – increasing the ISO can boost the apparent brightness of a captured image. However that also comes at the cost of increased noise, decreased dynamic range and the clipping of highlights (the stars loose their colour)
- Shutter Speed – increasing the shutter time to longer exposures does allow more light in. However it also leads to trailing stars as they move through the sky. Also the longer the (effective) focal length the quicker and more apparent star trailing occurs
This is why the use of very fast & ultra wide angle lenses (e.g. full frame 14mm f/1.8, 14mm f/2.4, 14mm f/2.5 or 14mm f/2.8) are very popular for astro photography. These both allow more light (due to aperture) and allow longer shutter speeds (due to wider field of view) (also allowing more light)
There is however another tool an astro photographer can use to combat the motion of the stars. An equatorial mount (more commonly known as a star tracker). These devices were originally invented to allow telescopes to automatically track objects in the night sky
They work by rotating at the same speed as the Earth, but in the opposite direction. For star trackers to work they also need to be aligned with the Earth’s rotational axis. This procedure is called polar alignment (essentially pointing the tracker towards the celestial pole). North or South depending on which hemisphere you are in
A star tracker allows photographers use longer focal lengths, smaller apertures and lower ISOs than you’d typically be able to use when shooting the night sky
A number of companies including SkyWatcher, iOptron and Vixen have been making a range of smaller, affordable, portable trackers for use with digital cameras
I just bought a tracker (the SkyWatcher Star Adventurer Mini kit). I purchased this particular unit because I also want to use some of it’s more unique additional features. Including it’s long exposure and astro timelapse functions. I also wanted a more compact lighter unit (for travel, etc). It just arrived so I’ve only done one quick test from my balcony at home at night
However even with a rough eyeball polar alignment (I didn’t use the latitude base or polar scope). I just used an app on my phone (PhotoPills) showing the equatorial grid, held up against the star tracker unit for manual alignment
The end result of some testing…
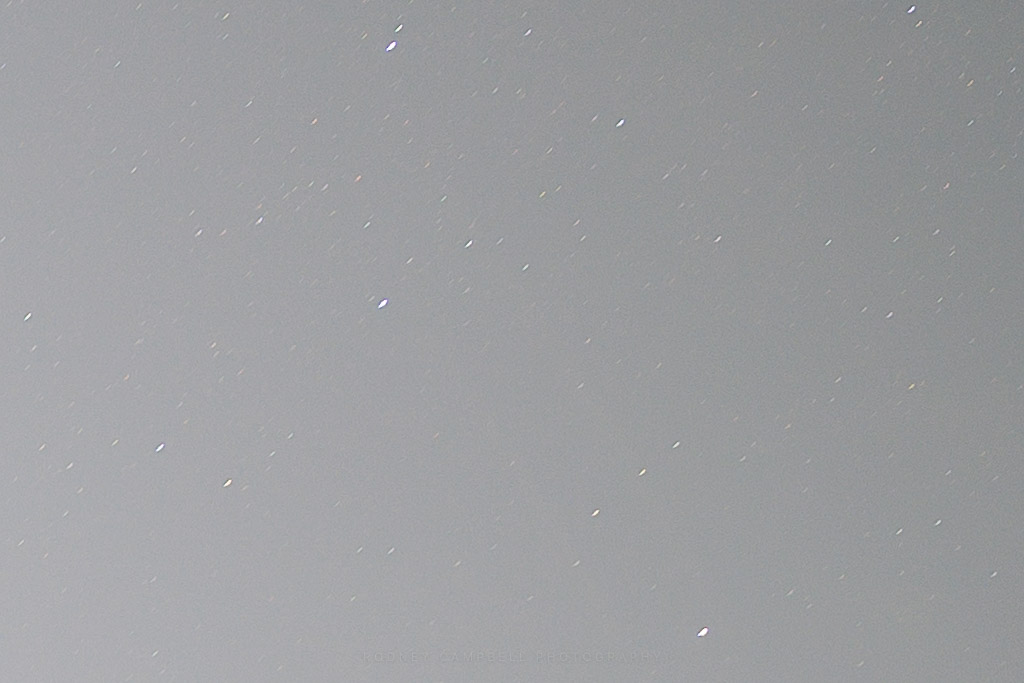
With the Samyang 14mm f/2.4 lens on the Z7. I got the same level of trailing (i.e. essentially pinpoint stars across the majority of the frame) in the extreme corners with an 180 second exposure using tracking (plus many more stars being visible) as I got with a 15 second exposure without tracking
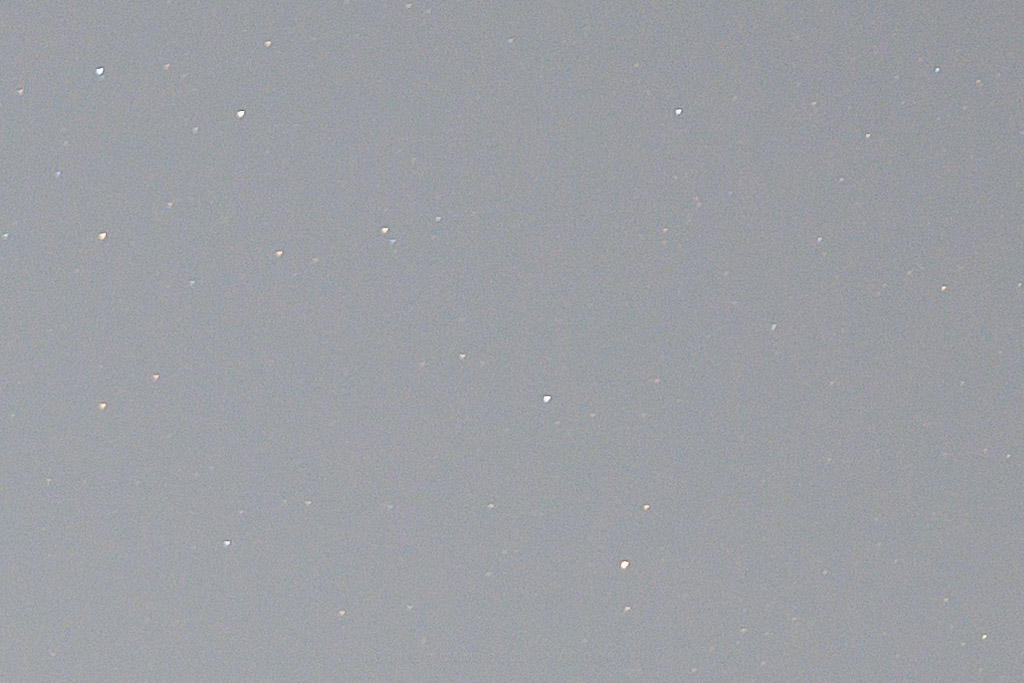
The following are some 100% crops taken from exactly the same pixel location in the two test images. The first pair are from towards the centre of the frame and then a pair at the extreme corners
Note that I shot with a large crescent moon in the frame – and in the city of Sydney, so I had quite a lot of light pollution. This meant I shot at lower ISO’s than I typically would in actual dark skies. It’s also why the test images are much more washed out than I’d expect under dark skies
Centre – Non Tracked – 15s
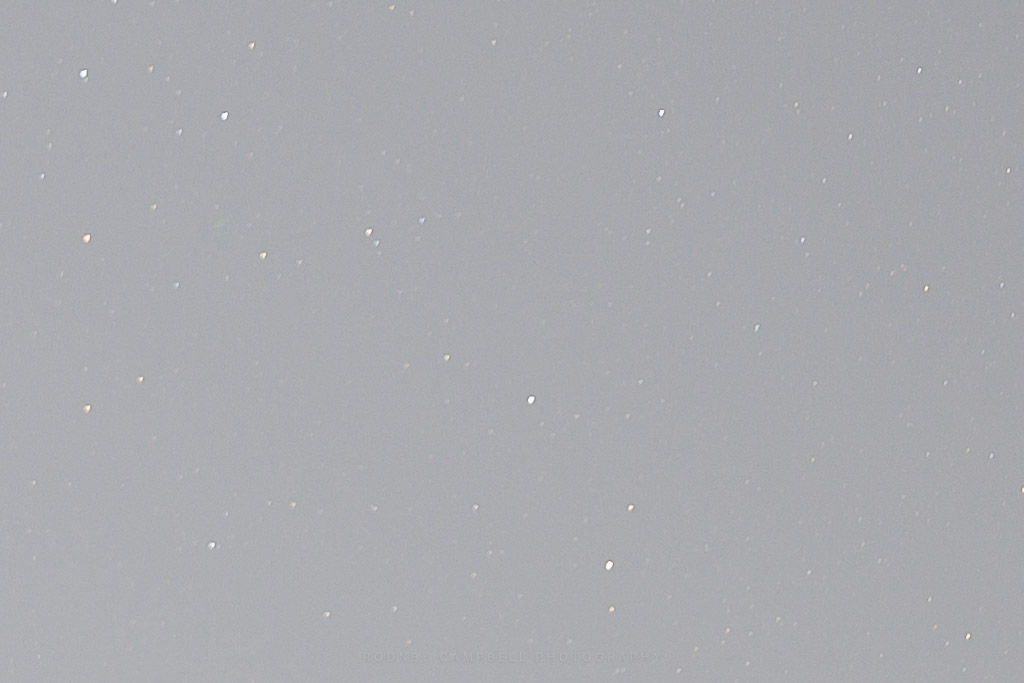
Centre – Tracked – 180s
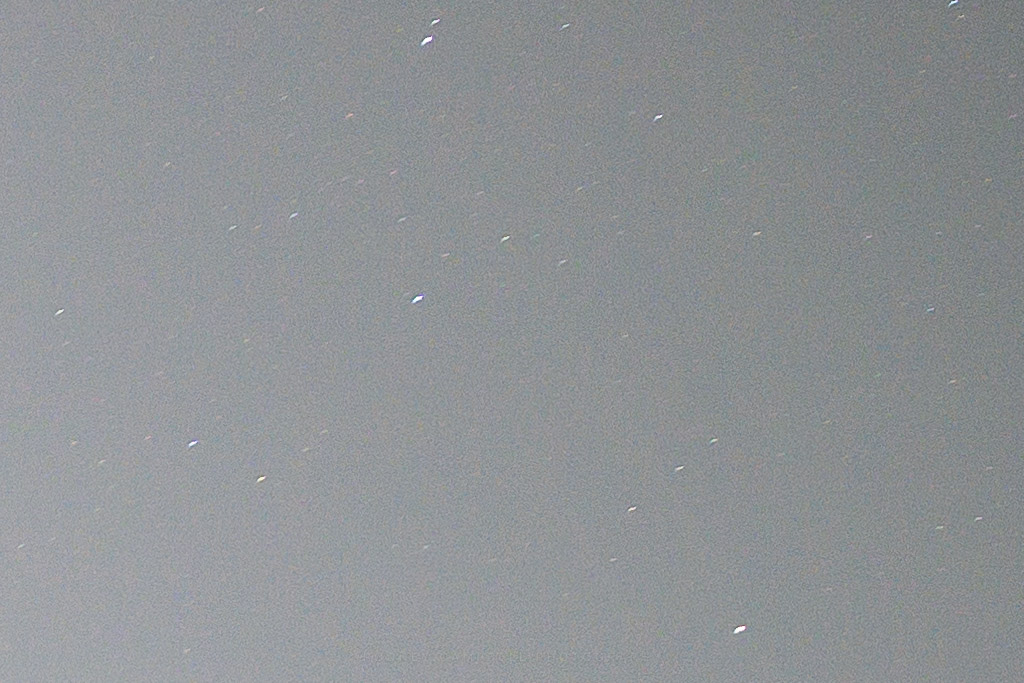
Corner – Non Tracked – 15s
Corner – Tracked – 180s
Note: These photographs (especially the wider shots) look much better when larger. To see larger versions in an inline overlay slideshow gallery viewer click any of the images.
This means I should be able to shoot at approximately ISO 600 & 180 sec / ISO 800 & 160 sec @ f/2.4 instead of my more typical target of ISO 6400 & 15s @ f2.4 (on the Nikon Z7). This will result in much cleaner (less noisy and more dynamic range) images. OR I could use a slower aperture (e.g. f/4 on the 14-30/4 Z lens) AND still use a lower ISO (e.g. ISO 1600)
The test images I also shot at 10 sec untracked and 120 seconds tracked were also very similar. They had extremely pinpoint stars even to the extremes of the corners. However that’s likely overkill and just for pixel peepers
The NPF Rule for sharp stars for this camera sensor (pixel pitch), lens focal length & aperture combination results in a 15 second exposure. This compares with the old 500 Rule which suggests a 36 second exposure! So the NPF rule (15 sec) (closer to a 200 Rule) is already extremely conservative and gives pinpoint stars across the majority of the frame
If I do a proper polar alignment (using the included latitude base and polar scope) I may be able to shoot for even longer. However for really wide angle shots like I’m expecting to mostly be doing (e.g. 14 to 24mm) an approximate polar alignment process like I’ve done is probably going to be sufficient every time
So… so far so good – I’ll really put this to the test during my forthcoming 10 week trip through remote north west Australia. Dark skies heaven coming up…
Nikon Z7 – One Month In
by Rodney Campbell on Jun.15, 2019, under Life, Photography
I’ve come from a D750 and recently (a bit over one month ago) purchased the Z7 + 24-70/4 + FTZ + 64GB XQD kit plus the 14-30/4 separately. I’m about one month into my Nikon Z mirrorless journey. So I thought I’d share some early thoughts and impressions of what I’ve found
I was considering the D850 – and it is very nice – but it’s so massive – way beyond what I want – I’m getting older and I’m just getting sick of lugging that heavy gear around (especially when travelling/on holidays)
I’ll be keeping my D750 as a backup body anyway when needed
My main use is landscape and nightscape (astro/light painting/etc) photography so for me some of the benefits of the Z series is very welcome. Not just the smaller and lighter typical landscape kit: D750 (or D850) + 24-70 + 16-35 (or 14-24)) vs Z7 + 24-70 + 14-30 – but the additional flow ons from this – I can use just my 100mm slot in filter system all the way down to 14mm with no vignetting (that’s massive for me)
One month later and I’ve only done a few shoots so far. I’m learning and discovering new things as I go. There are definitely what I’d call pluses and minuses. e.g. it’s a tiny thing but you can’t just raise the camera to the eye and look through the optical viewfinder to quickly check lens selection/focal length – without turning the camera on /or waking it up
But I’m finding a number of pluses
- I can zoom in (up to 100 or 200%) to check focus/etc (both before and after the shot) in the viewfinder!! Also focus peaking with manual focus in the viewfinder (zoomed) rocks. I’m getting older so I have to wear glasses to see (focus my eyes) the rear LCD. However I don’t have to get them out and wear them when looking through the diopter adjusted viewfinder. I just have to remember to do this more often out in the field 🙂
- Having focus points across pretty much the whole frame is awesome. I’m constantly setting up a great landscape composition on the tripod and finely adjusting things. Only to then discover I havn’t focused yet. With the D-SLR I often couldn’t get a focus point over something at the right distance. I’d then have to move the ballhead and get focus, lock it to manual and then recompose the shot again to shoot. No more with the Z – I just move the focus point to where it needs to be and voila
- Using a viewfinder that auto brightens up when it’s dark (e.g. during astro twilight/twilight) is fantastic. Likewise seeing through heavy ND’s means I can compose/focus/etc with it on and don’t have to take the filter in and out like I used to
- I no longer have to repeatedly block and unblock the viewfinder with the slide on cover (D600/D750). When I’m out shooting at night or with heavy ND’s during the day. This was probably the only reason I wanted a pro (D8XX) body vs the “consumer” FX (D6XX/D750). So I could get that viewfinder blind switch – now no longer necessary at all
- Even tiny things like how the viewfinder extends back from the camera a bit. I shoot funny – left eyed. So on normal D-SLR’s my nose is smashed against the LCD and smudging it all the time – but not with the Z)
I admit the body height is just a tiny touch too short (for me). I don’t like pinky dangling at all – and I have pretty small hands. However I permanently leave a full arca L-bracket on every one of my cameras. So I just got the RRS L-Plate Set for Nikon Z – which has the bit that goes right across the bottom of the camera (including around the battery door where the hand grip is). This raises the height of the whole camera/grip by about 10mm and it has a nice sloped area to hold my pinky on – perfect. For those that don’t want to stomach the $185 USD price tag – there’s also a similar looking knock off copy one on ebay for less than $40 AUD
The physical ergonomics of the Z camera is actually extremely good (much more like holding and using my D750 – just lighter). The UX is also very good (for Nikon shooters it’s totally familiar). One of the reasons I’d never consider the current Sony A7’s (too small and no ergonomic grip or buttons at all)
Cost is definitely a factor – the Z bodies (especially the Z7 vs the Z6) is expensive. Personally I reckon the Z6 is about the right price (e.g. a direct D750 competitor/upgrade). The Z7 however in my mind has too much of a premium (the only real difference being the sensor itself – unlike the D850 to D750 comparison)
Likewise the current Z lens set feels like it has a premium – those lenses are all expensive. Yes they are typically outstanding and class leaders (even compared to their F-mount (or in fact any mount) counterparts)
Barely Focused
by Rodney Campbell on Jun.13, 2019, under Life, Photography
Barely Focused

NIKON Z 7 + NIKKOR Z 14-30mm f/4 S @ 14 mm, 4 sec at f/9, ISO 64 x 3 Frames
So here is a shot with the Z 14-30mm lens at 14mm WITH filters. In this case with the Nisi V6 holder with the CPL and 100mm grad filter
Note the vignetting you see in the image here is NOT from the lens or filters – I added that as part of post processing. The original image had very little if any noticeable vignetting at all
There are some limitations with a camera with such a high resolution (46MP) sensor with a high pixel density. One of those is that it becomes diffraction limited at lower apertures than I’ve previously been used to. In this case you may start noticing the impact of diffraction from around f/8 to f/11. The practical impact of this is that it can make it more difficult to have enough depth of field
In this shot I’ve got an extremely close foreground (less than 50cm from the camera). So achieving acceptable sharpness and detail from foreground to background whilst limiting aperture is “difficult”
So I’ve taken three images here at different focus points and blended them in post. Essentially one image is focused right on the closest foreground (but the background is very blurry). The next is focused toward the outer edge of the carpet of green. The last is a touch further on and it to the background are sharp. I probably could have done this using just two of the shots but …
Totally bare
by Rodney Campbell on Jun.12, 2019, under Life, Photography
Totally bare

NIKON Z 7 + NIKKOR Z 14-30mm f/4 S @ 16 mm, 62 sec at f/9, ISO 64
That’s how I felt about the skies this morning
Instead of the promised sky totally filled with high and middle cloud right down to the south… We have almost nada…
Make do with what we’ve got
This shot a little after sunrise so we have some golden glow on the cliffs in the distance
A CPL stacked with a 0.9 (3 stop) grad and the six stop Lee LittleStopper to drag out the exposure and smooth out the water
-
Hi! Welcome to Rodney Campbell's Blog!
Thanks for dropping by! Feel free to join the discussion by leaving comments, and stay updated by subscribing to the RSS feed. See ya around!
Follow Me!


