Archive for June, 2011
Sirui N2204 + K20x Tripod Set…
by Rodney Campbell on Jun.27, 2011, under Life, Photography
I’d ordered a new Sirui N2204 + K20x (arca swiss style ballhead with friction control) carbon fibre Tripod set from DZone2 a few weeks ago – I paid $429 AUD delivered all up.
The delayed arrival was no fault of the vendor BTW – they sent it pretty much straight away – Fedex and Australian customs had it languishing for two weeks here in Sydney before they bothered to try and contact me for the information they wanted (confirmation of the price I paid) before waiting a few more days before releasing it from customs. Fedex should definitely exclude the term “Express” from their moniker
I had been looking to replace my venerable Manfrotto 190 Pro B (the very old model) + 488RC4 ball head (which would be consigned to my daughter) which I had bought about 15 years ago and had given me extremely good service. The seascapes of the past year however hadn’t been very kind to it and it was now getting very corroded in places.
My 190 Pro B has in theory (from google searching old records) specs of 2kg (max load capacity of 5kg), 3 leg sections and a folded length of 56cm and a max height (centre column down) of 119cm and with the column up of 145cm. With the 488RC4 ballhead it is 2.8Kg and 67.5cm folded. Basically I try to use it with the column down most of the time but I often find it too low so ideally I wanted something which is perhaps 15-20cm taller with the column down. I did want my new tripod to be lighter and my main wish is for a much smoother better ballhead (I am quite keen on a Really Right Stuff BH40 and an RSS L plate for my D7000).
I leant towards 4 section tripods so I could keep the folded length down to around the same or less than the Manfrotto.
After much soul searching I eventually opted for a reasonable compromise – the Sirui N2204 + K20x Tripod Set. The specifications of which are for the tripod: carbon fibre, 4 legs, 1.2kg in weight, maximum load capacity of 15kg, 46cm folded (when reversed) or 53cm when not, it can go as low as 17cm (for low level ground work – when using the supplied short column) and as high as 139cm (without the centre column raised) and 165cm with the centre column raised (basically the camera would be above my head). It is an 8X carbon fiber 4 section tripod that features a detachable monopod leg in which you can simply unscrew from the rest of the tripod, and assemble with the provided accessories kit into a functional, regular-sized monopod (I already have a Benro carbon fibre monopod so this wasn’t so much of a concern for me). It also comes with an extra short center column that is easily interchangeable with the principal center column, and allows for low-height shooting. There are three adjustment angles available for the legs and each consists of an automatic lock mechanism and it also has a bag hook on the bottom to add extra stability. Lastly it all comes in a nice carry bag and with carrying straps.
The K20x Ballhead weighs 400g, has a load capacity of 25kg, is 98mm high and has an arca swiss style quick release plate, is friction adjustable and has panning capability.
The idea behind this would be to introduce me to an arca swiss style QR plate and to a ball head with friction capability (and get an RSS L Plate soon after) with the view to eventually upgrade to the RSS BH40 and I could move the K20x to my Manfrotto 190 and use the supplied plate with the D90 (for my daughter). It would however presumably let me move my D7000 with L plate between both heads/tripods.
I was seriously considering the bees knees of tripod brands – the Gitzo Mountaineer GT2541 4leg/1.36kg/12kg 55.5cm (folded) 17cm (lowest) 130cm (max height no centre column) & 153cm (column extended) but it would have been considerably more expensive (just for the legs) and I really couldn’t justify the cost and I’d rather sink the money in a good ballhead I could keep forever.
I havn’t yet had the chance to use the tripod and I’ll post more once I have… however…
The ballhead seems very smooth (much better than my Manfrotto 488RC4 ball head) plus it has the ability to set the friction which is nice – so I don’t have to have it go from tight to flopping around like the Manfrotto. The control thing for setting the friction is tiny however so I’d hope there’s no real need for changing that much out in the field?
… now for that RSS L plate for my D7000 and perhaps a BH40… hmmm…
Orbs of Light @ Balls Head…
by Rodney Campbell on Jun.24, 2011, under Life, Photography
My daughter and I had been planning on attempting some night light painting and specifically creating an orb of light for a number of weeks.
We’d bought a set of clear battery powered LED Christmas lights online for $5 with the intent of making something suitable to use to create the light orb and finally we had a fullish moon on a clear night (although very windy unfortunately) so we headed down to Balls Head reserve (yes I know the irony of it all :)) on Sydney Harbour to see what we could produce.
For those not familiar with an Orb of Light and light painting at night…
We first need a few items in preparation:
- Tripod – we’ll be doing very long exposures so we need something stable to hold the camera very steady
- Camera – set to a low ISO (to minimise noise and to assist with having a long shutter speed) – in this case ISO 100; we also want to use a long shutter speed (in the order of minutes) so we shoot in Full Manual Mode and set to Bulb mode
- Remote Timer Shutter Release – the programable timer I have allows me to set both a variable initial delay (which allows me to start things and then move into the image to the spot where I want to create the orb and start the light and start spinning before the exposure starts – otherwise you’d see a trail of light entering the frame to the orb) as well as a specific (long) shutter time
- Dark Clothes – so we don’t appear in the images – we are constantly moving so we don’t really “appear” in the long exposure however if we wore something bright the ambient light might light us up enough to leave a ghost image
- A Light Source – something small and portable (battery powered) with an on/off switch to use to create the orb of light itself in the image
The Light Source
To create our light source we took a string of clear battery powered Christmas lights and basically butchered them :). We bunched as many of the LED lights at the end as we could and then taped up the remainder of the string to the battery pack using layers of thick black gaffers tape. This basically results in a black string about one and a half metres long with a battery pack and switch at one end and a bunch of clear LED lights at the other end. So that we can have a coloured light orb we also took some small sheets of coloured paper (in this case purple and green origami paper) and taped each over half the lights so that when the lights are on one half is green and the other purple.
See the image below for our creation – it isn’t particularly robust (which was a problem for us on the night) so we might have to create something more reliable for next time.
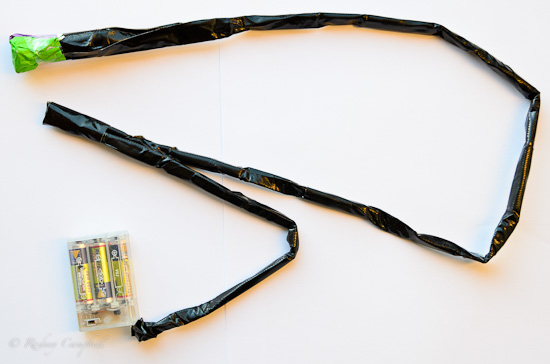
NIKON D7000 + 17.0-50.0 mm f/2.8 @ 32 mm, 1/60 sec at f/4, ISO 450
Creating the Orb of Light
The basic method for creating the orb of light is that you hold the battery pack end of the light string you’ve made in one hand held slightly out from your body. Let the end with all the lights dangle so it is almost touching the ground and then hold the string in your hand. You then mark a spot on the ground and slowly shuffle around in a small circle keeping your feet pointed at the spot marked on the ground. Whilst doing this you use the one hand and wrist to spin the string and the lights at the end around in a vertical circle with the aim of having the light pass directly over the marked spot on the ground as you rotate. You essentially keep doing this rotating around and having the light spin in a circle overhead and over the spot below for an “appropriate” amount of time whilst taking a long exposure with the camera. The effect of the spinning circles of light is that it leaves a constant trail of light on the image – painting the orb of light into the long exposure.
Why a Full Moon
The reason we shot on (or actually near) a full moon is that whilst you can make an orb of light at any time it doesn’t really provide much light other than the thin trails it leaves. It doesn’t light up the environment around it so if you do it on a dark night all you’ll see is the orb floating in black space – it could be anywhere really. So during a very long exposure the full moon actually provides the ambient light source which slowly lights up the landscape around the orb and the whole environment within the image. In fact if you expose for long enough you can almost make night look like day and the image will look like a mysterious daytime scene.
Generally most people shoot orb images far away from cities and populated areas where there might be lots of man-made light pollution and just have the moonlight to light the landscape. This requires extremely long exposures at low ISO settings (in the tens of minutes) but the images have an eerily lit landscape with the bright orb within them.
Our First Orbs
As we were heading down towards the harbour anyway and it was still fairly early we first headed to just under the Sydney Harbour bridge near Luna Park. It was early evening and the moon was still low on the horizon so we were thinking of trying some images down there (perhaps with the moon it it).
The city and bridge are very well lit at night, as are the walkways near Luna Park so it was difficult to generate exposures of significant enough length without overexposure. We used a 3 stop hard graduated neutral density filter to try and reduce the exposure of all the city, bridge and some street and path lights but it was impossible to set the filter to do just what we wanted – we ended up doing the best we could and settled on 2 minute exposures. All the cars and buses driving through the area tended to shine bright lights directly into our scene as we were taking images both lighting the spinning person up and wrecking the exposure and even the bright streetlights were too brightly lighting everything up and in the end we gave it up as a lost cause for our first attempt and decided to move on.
We then drove over to Balls Head reserve where there are no street lights, houses or vehicles – basically no lights at all – ahh blissful darkness (sort of).
We did however still want to try and use the city as our backdrop so we again used the ND Grad to darken down the city lights as best we could and were able to use four minute exposures at around f/5.6. This provided the time to spin our orbs of light and not overexpose the city. It wasn’t quite enough for the fullish moon to expose the landscape around us properly but you can start to see the effect and if we were to shoot some images of say 15 minutes or more I expect we’d have a very different look to the general landscape.
Note: These images (especially the wider shots) look much better when larger – so click any of the images below to see larger versions in an inline overlay gallery viewer.
This is our first orb at Balls Head reserve – I muffed the orb a bit (shuffling about on the rock) but you can see what we were going for – we moved the tripod and changed the composition and did another here for which the orb was much better but the background composition and the lighting on the landscape and rocks was not as strong as this first image.
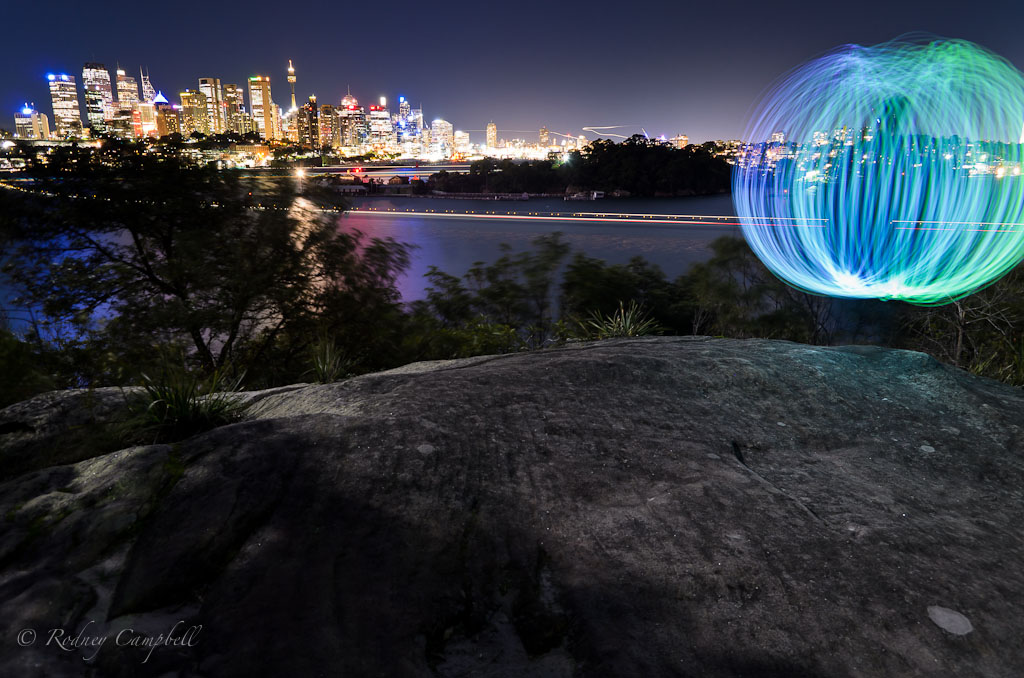
NIKON D7000 + 17.0-50.0 mm f/2.8 @ 17 mm, 240 sec at f/5, ISO 100
This second image is the last we took on the night and is at another location at Balls Head. This orb was spun by my daughter – she chose the spot to put the orb and she did the spinning work – and did a pretty great job 🙂
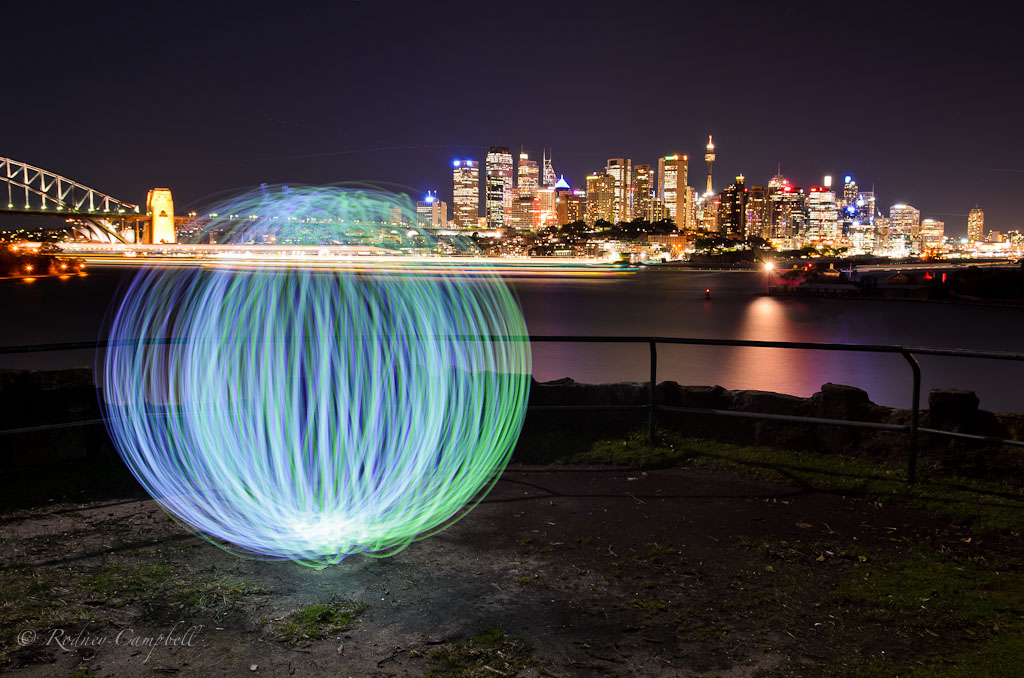
NIKON D7000 + 17.0-50.0 mm f/2.8 @ 22 mm, 240 sec at f/5.6, ISO 100
Street: Week 23 – 90mm…
by Rodney Campbell on Jun.21, 2011, under Life, Photography, Street
Week 23 – 90mm
I’m using my Tamron 90mm macro lens this week, this first image I saw the strong shadows and liked the potential there. I tried converting to monochrome but ended up liking the original colour image better.
Shadows

NIKON D7000 + 90.0 mm f/2.8 @ 90 mm, 1/400 sec at f/4, ISO 100
Arrows

NIKON D7000 + 90.0 mm f/2.8 @ 90 mm, 1/160 sec at f/5, ISO 1100
The BigStopper Diaries…
by Rodney Campbell on Jun.19, 2011, under Life, Photography
I’d purchased the B+W ND 3.0 (1000x) 10-Stop ND filter some time ago but I hadn’t gone out and shot any images with the specific intention of using the effect of the filter. I have been out shooting other things and then whipped out the bigstopper for a few shots but I hadn’t until now made a conscious plan to go out with the intention of composing and using the filter in mind.
The 10 stop ND filter basically looks like a piece of black glass and the practical upshot of this is that it evenly reduces the amount of light coming through the lens into the camera to one – one thousandth of the original light (so very very dark). So why would you want to essentially turn day into night you may ask… well what this allows you to do is take very long exposures (tens or even hundreds of seconds in this case) during daylight hours which is normally not the case. This has a very specific effect on certain things – like clouds which are moving turn to smears across the sky and moving water turns to a milky white fog and objects which might move in the frame (like walking people) simply disappear.
So over the long weekend I waited for the opportunity to arise. I had a specific location in mind (Bradley’s Head) which is a headland protruding from the north shore of Sydney Harbour (near Taronga Zoo). I was hoping for a large expanse of moving water, overcast skies and not too bright conditions so I could use really long exposures, windy conditions leading to moving cloud formations and ideally something like fog or mist over the city on the other side of the harbour (the last perhaps too much to ask for :)).
I got a bit of a break in the weather late one day and I ventured out to take some long exposures. This was also an ideal time to use my new $20 remote LCD timer which worked a treat allowing me to dial in specific timed exposures without having to manually monitor things.
Note: These images (especially the wider shots) look much better when larger – so click any of the images below to see larger versions in an inline overlay gallery viewer.
Stones in the Mist

NIKON D7000 + 17.0-50.0 mm f/2.8 @ 17 mm, 135 sec at f/16, ISO 100 + ND3.0
Road to Sydney

NIKON D7000 + 17.0-50.0 mm f/2.8 @ 38 mm, 180 sec at f/16, ISO 100 + ND3.0
Milk

NIKON D7000 + 17.0-50.0 mm f/2.8 @ 27 mm, 150 sec at f/16, ISO 100 + ND3.0
This last exposure I’ve left in colour, taken just as the sun was setting. This was one of the longest exposures (at 300 seconds) and I used the trusty moving hand grad (for about two minutes of the exposure) to tone down the sky a little so it wouldn’t blow out.
Long Sunset

NIKON D7000 + 17.0-50.0 mm f/2.8 @ 17 mm, 300 sec at f/13, ISO 100 + ND3.0
Vivid Sydney 2011…
by Rodney Campbell on Jun.17, 2011, under Life, Photography
I joined a handfull of my work colleagues from the office on saturday evening to take some photos of sunset on the harbour (which wasn’t particularly great) and the lights of Vivid Sydney – until early rain halted our evening.
Note: These images (especially the wider shots) look much better when larger – so click any of the images below to see larger versions in an inline overlay gallery viewer.
The view of the Sydney Harbour bridge as the sun sets behind it as viewed from the Sydney Opera House
Skylines

NIKON D7000 + 17.0-50.0 mm f/2.8 @ 17 mm, 0.4 sec at f / 13, ISO 100
Similar vantage point with a wider lens towards the end of twilight (5:25PM)
Twilight Show

NIKON D7000 + 8.0-16.0 mm f/4.5-5.6 @ 8 mm, 30 sec at f / 11, ISO 100
After grabbing some dinner in the Rocks Markets it was just starting to sprinkle lightly so we quickly headed down to the overseas passenger terminal to grab some obligatory shots of the Opera House being painted
Beaming Sails

NIKON D7000 + 17.0-50.0 mm f/2.8 @ 34 mm, 20 sec at f / 7.1, ISO 100
A shot timed to have a Water Taxi bob it’s way through the image
Taxi Anyone?

NIKON D7000 + 17.0-50.0 mm f/2.8 @ 50 mm, 15 sec at f / 5.6, ISO 100
Then it really started to rain so the evening was abandoned 🙁
-
Hi! Welcome to Rodney Campbell's Blog!
Thanks for dropping by! Feel free to join the discussion by leaving comments, and stay updated by subscribing to the RSS feed. See ya around!
Follow Me!


