Orbs of Light @ Balls Head…
by Rodney Campbell on Jun.24, 2011, under Life, Photography
My daughter and I had been planning on attempting some night light painting and specifically creating an orb of light for a number of weeks.
We’d bought a set of clear battery powered LED Christmas lights online for $5 with the intent of making something suitable to use to create the light orb and finally we had a fullish moon on a clear night (although very windy unfortunately) so we headed down to Balls Head reserve (yes I know the irony of it all :)) on Sydney Harbour to see what we could produce.
For those not familiar with an Orb of Light and light painting at night…
We first need a few items in preparation:
- Tripod – we’ll be doing very long exposures so we need something stable to hold the camera very steady
- Camera – set to a low ISO (to minimise noise and to assist with having a long shutter speed) – in this case ISO 100; we also want to use a long shutter speed (in the order of minutes) so we shoot in Full Manual Mode and set to Bulb mode
- Remote Timer Shutter Release – the programable timer I have allows me to set both a variable initial delay (which allows me to start things and then move into the image to the spot where I want to create the orb and start the light and start spinning before the exposure starts – otherwise you’d see a trail of light entering the frame to the orb) as well as a specific (long) shutter time
- Dark Clothes – so we don’t appear in the images – we are constantly moving so we don’t really “appear” in the long exposure however if we wore something bright the ambient light might light us up enough to leave a ghost image
- A Light Source – something small and portable (battery powered) with an on/off switch to use to create the orb of light itself in the image
The Light Source
To create our light source we took a string of clear battery powered Christmas lights and basically butchered them :). We bunched as many of the LED lights at the end as we could and then taped up the remainder of the string to the battery pack using layers of thick black gaffers tape. This basically results in a black string about one and a half metres long with a battery pack and switch at one end and a bunch of clear LED lights at the other end. So that we can have a coloured light orb we also took some small sheets of coloured paper (in this case purple and green origami paper) and taped each over half the lights so that when the lights are on one half is green and the other purple.
See the image below for our creation – it isn’t particularly robust (which was a problem for us on the night) so we might have to create something more reliable for next time.
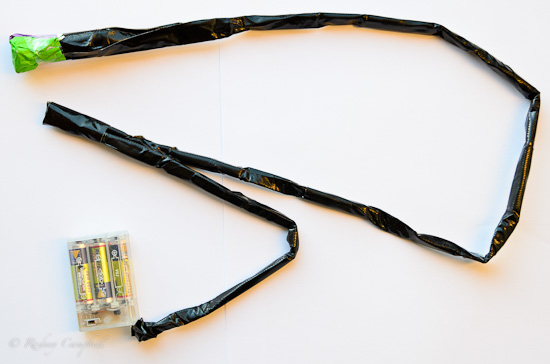
NIKON D7000 + 17.0-50.0 mm f/2.8 @ 32 mm, 1/60 sec at f/4, ISO 450
Creating the Orb of Light
The basic method for creating the orb of light is that you hold the battery pack end of the light string you’ve made in one hand held slightly out from your body. Let the end with all the lights dangle so it is almost touching the ground and then hold the string in your hand. You then mark a spot on the ground and slowly shuffle around in a small circle keeping your feet pointed at the spot marked on the ground. Whilst doing this you use the one hand and wrist to spin the string and the lights at the end around in a vertical circle with the aim of having the light pass directly over the marked spot on the ground as you rotate. You essentially keep doing this rotating around and having the light spin in a circle overhead and over the spot below for an “appropriate” amount of time whilst taking a long exposure with the camera. The effect of the spinning circles of light is that it leaves a constant trail of light on the image – painting the orb of light into the long exposure.
Why a Full Moon
The reason we shot on (or actually near) a full moon is that whilst you can make an orb of light at any time it doesn’t really provide much light other than the thin trails it leaves. It doesn’t light up the environment around it so if you do it on a dark night all you’ll see is the orb floating in black space – it could be anywhere really. So during a very long exposure the full moon actually provides the ambient light source which slowly lights up the landscape around the orb and the whole environment within the image. In fact if you expose for long enough you can almost make night look like day and the image will look like a mysterious daytime scene.
Generally most people shoot orb images far away from cities and populated areas where there might be lots of man-made light pollution and just have the moonlight to light the landscape. This requires extremely long exposures at low ISO settings (in the tens of minutes) but the images have an eerily lit landscape with the bright orb within them.
Our First Orbs
As we were heading down towards the harbour anyway and it was still fairly early we first headed to just under the Sydney Harbour bridge near Luna Park. It was early evening and the moon was still low on the horizon so we were thinking of trying some images down there (perhaps with the moon it it).
The city and bridge are very well lit at night, as are the walkways near Luna Park so it was difficult to generate exposures of significant enough length without overexposure. We used a 3 stop hard graduated neutral density filter to try and reduce the exposure of all the city, bridge and some street and path lights but it was impossible to set the filter to do just what we wanted – we ended up doing the best we could and settled on 2 minute exposures. All the cars and buses driving through the area tended to shine bright lights directly into our scene as we were taking images both lighting the spinning person up and wrecking the exposure and even the bright streetlights were too brightly lighting everything up and in the end we gave it up as a lost cause for our first attempt and decided to move on.
We then drove over to Balls Head reserve where there are no street lights, houses or vehicles – basically no lights at all – ahh blissful darkness (sort of).
We did however still want to try and use the city as our backdrop so we again used the ND Grad to darken down the city lights as best we could and were able to use four minute exposures at around f/5.6. This provided the time to spin our orbs of light and not overexpose the city. It wasn’t quite enough for the fullish moon to expose the landscape around us properly but you can start to see the effect and if we were to shoot some images of say 15 minutes or more I expect we’d have a very different look to the general landscape.
Note: These images (especially the wider shots) look much better when larger – so click any of the images below to see larger versions in an inline overlay gallery viewer.
This is our first orb at Balls Head reserve – I muffed the orb a bit (shuffling about on the rock) but you can see what we were going for – we moved the tripod and changed the composition and did another here for which the orb was much better but the background composition and the lighting on the landscape and rocks was not as strong as this first image.
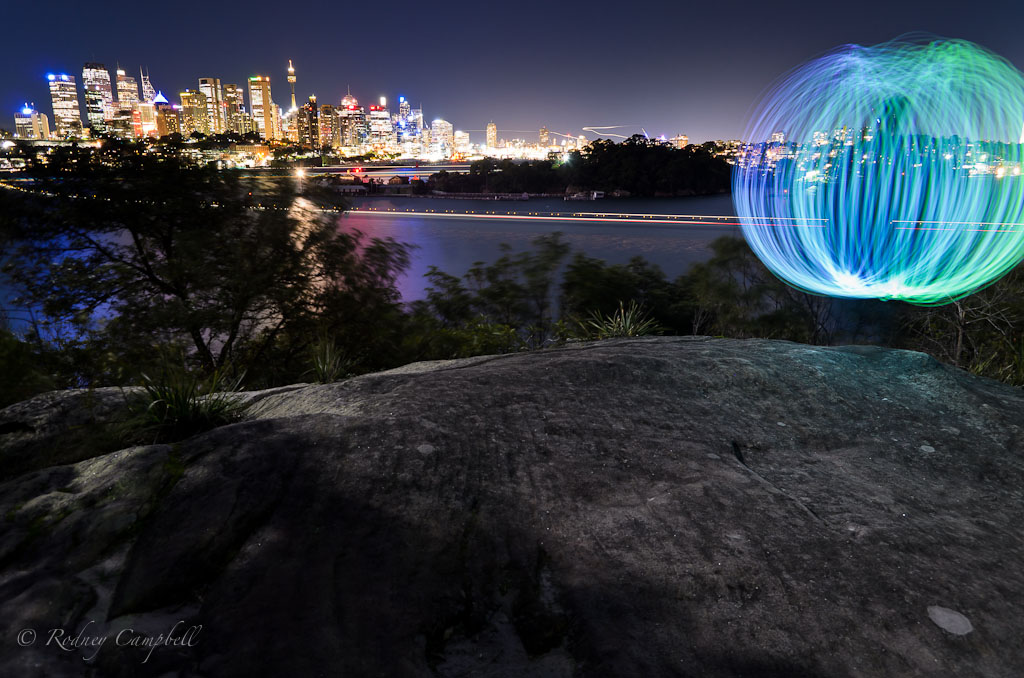
NIKON D7000 + 17.0-50.0 mm f/2.8 @ 17 mm, 240 sec at f/5, ISO 100
This second image is the last we took on the night and is at another location at Balls Head. This orb was spun by my daughter – she chose the spot to put the orb and she did the spinning work – and did a pretty great job 🙂
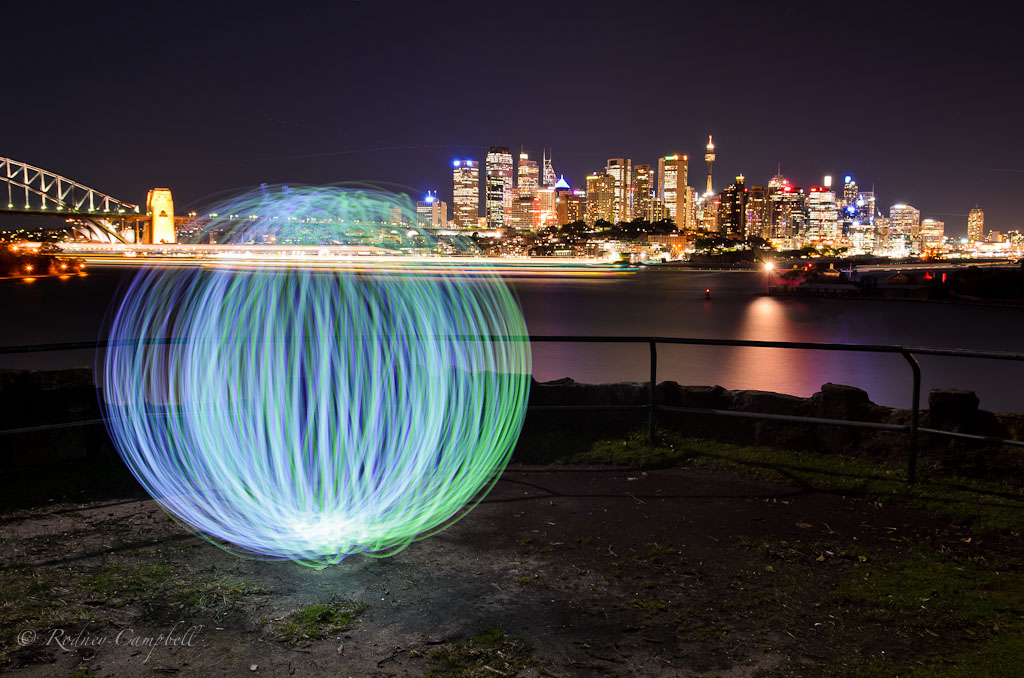
NIKON D7000 + 17.0-50.0 mm f/2.8 @ 22 mm, 240 sec at f/5.6, ISO 100


-
Hi! Welcome to Rodney Campbell's Blog!
Thanks for dropping by! Feel free to join the discussion by leaving comments, and stay updated by subscribing to the RSS feed. See ya around!
Follow Me!


April 28th, 2012 on 2:01 am
Wonderful site, fair to view and set out well. From another photographer well done