Green… (Macro Focus Stacking)…
by Rodney Campbell on Aug.09, 2012, under Life, Photography
I took my camera, 90mm macro, LED macro ring light, tripod and wireless remote release into work with me in an attempt to try my hand at a new technique (for me at least) – that of focus stacking macro images.
The basic idea with focus stacking is to try and overcome the limitations of limited depth of field with very close focus macro subjects.
In essence the closer you get to your subject the shallower the depth of field at any given focal length and aperture combination. With macro photography because you are often focusing near the minimum focusing distance from your lens (i.e. very close to subject), even with the lens stopped down as far as it can go gives very little depth of field to work with. If your subject is flat and aligned parallel to the sensor plane as long as you can get your focus spot on you may get a nicely in focus subject – otherwise what generally happens is some or all of your subject ends up being out of focus.
With focus stacking you take a sequence of images at different focus distances which cover the whole of your subject and then in software afterwards you load the stack of images and it “magically” takes the in focus portions of each image and combines them onto a single image where your subject is in focus from front to back.
OK this sounds great in theory but how hard is it to do in practice… well I was about to find out.
My technique was this:
– find a suitable subject
– setup your composition – normal photography rules apply – you have to consider your subject and your background (even if you’re trying to make sure the background is nicely blurred out)
– lock down on a tripod – you want to take a sequence of images so you can’t move between them
– select an appropriate aperture, shutter speed and iso for your shot – I suggest you go into full manual for this since you don’t want this to change between shots otherwise the blending which happens later on may get ugly – personally I used a relatively wide aperture (around f/4 to f/5.6) because I want the background to go all smooth and buttery and I don’t want any distractions there
– put the lens into manual focus mode
– focus your lens on the closest part of your subject – and then rotate the focus fractionally so your focusing slightly in front of this point (basically it will seem like everything is out of focus at this point) and take a shot
– rotate the focus ring fractionally so that it focuses slightly further away from the camera and take another shot
– repeat the above for however many times till your point of focus moves just past the furthest part of your subject that you want to be in focus
– load the sequence of images into the stacking software and possibly adjust some parameters and let it do it’s thing
– voila…
NB: another technique for this includes using something like a macro focusing rail on you tripod – in effect moving the camera forward and back fractionally with a fixed manual focus instead of changing focus on the lens
Some things to consider:
– if you shoot a sequence of images stopped down you may need to take less images because the depth of field for each image covers a wider area but you are more likely to end up with a more distinct and messier background
– if your camera or subject moves much between shots during the sequence you are likely to be hosed – software these days is pretty good and seems to be able to do remarkable things with auto aligning images but there’s only so much it will be able to cope with – see my failed day below 🙂
– objects often change their size and position from shot to shot due to focus distance changes (and with my Tamron 90mm f/2.8 1:1 macro which extends the front of the lens dramatically with changes in focus and I can see the composition change slightly) however the software seemed to be able to cope quite well with this
Stacking software options
There are a number of software options (depending on how much you are willing to spend) which can enable you to perform focus stacking including PhotoShop (Auto Align Layers/Auto Blend Layers), Helicon Focus, Zerene Stacker, CombineZP.
The results
My first day out from the office was a bit of a disaster – I’d headed into Hyde Park in the city during lunchtime (I know not the greatest time to be trying this) but the main problem was the gusts of wind blowing the flowers. I tried to shoot between gusts when motion was minimised but it was a quest in futility… basically the stacking software did a great job with some of the bits which didn’t move so much but the petals blowing in the wind or long stems swaying in the breeze resulted in incredibly sharp blurry messes 🙂
Not to be deterred I headed out again the next day but this time to the Royal Botanical Gardens here in the city and looked for more sheltered plants or ones with stronger stems and branches which would hold my subject still enough for the shots I wanted. This resulted in much improved results as you’ll see below and in forthcoming days as I process the rest of the images…
Note: These images (especially the wider shots) look much better when larger – so click any of the images below to see larger versions in an inline overlay slideshow gallery viewer.
Firstly here is the shot you’d normally take. The subject is not particularly small so I could shoot with a little distance – I’m stopped down to f/11 for increased depth of field which even with the LED ring light required I shoot at ISO 1600 at 1/100th. I’ve focused sort of in the middle of the depth of the front face of the subject and as you can see it’s sort of sharp in limited places – it’s not horrendous but it’s not great
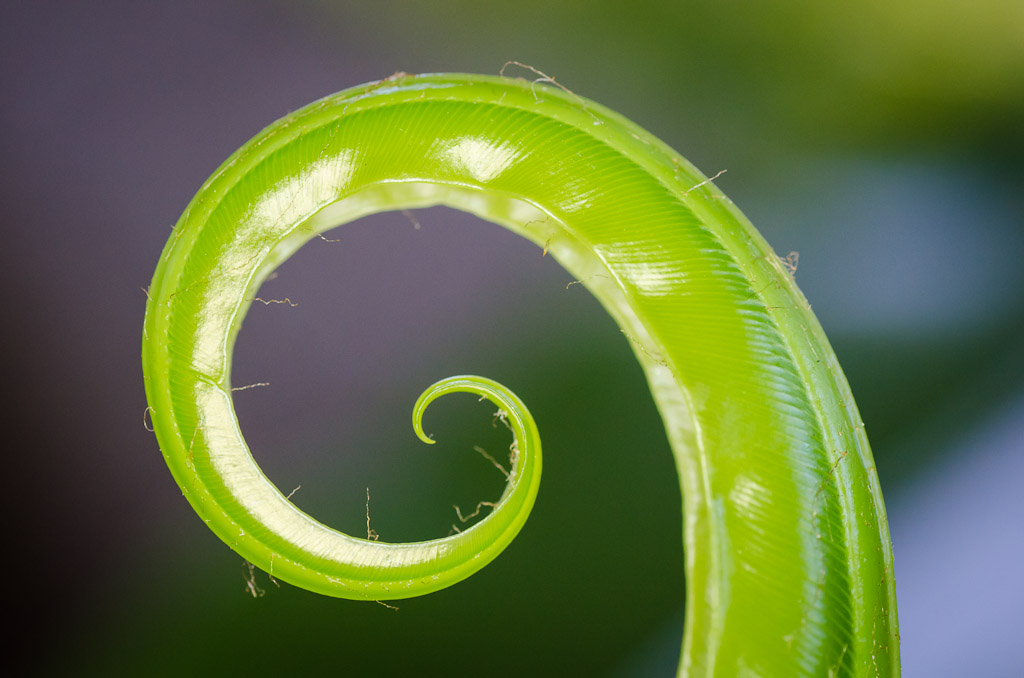
NIKON D7000 + 90.0 mm f/2.8 @ 90 mm, 1/100 sec at f/11, ISO 1600
Here is the result of stacking 12 images shot again at 1/100th but at f/4.5 meaning I only needed to be at ISO 320 – IMHO whilst not fantastic is still a much better result
Green Spiral
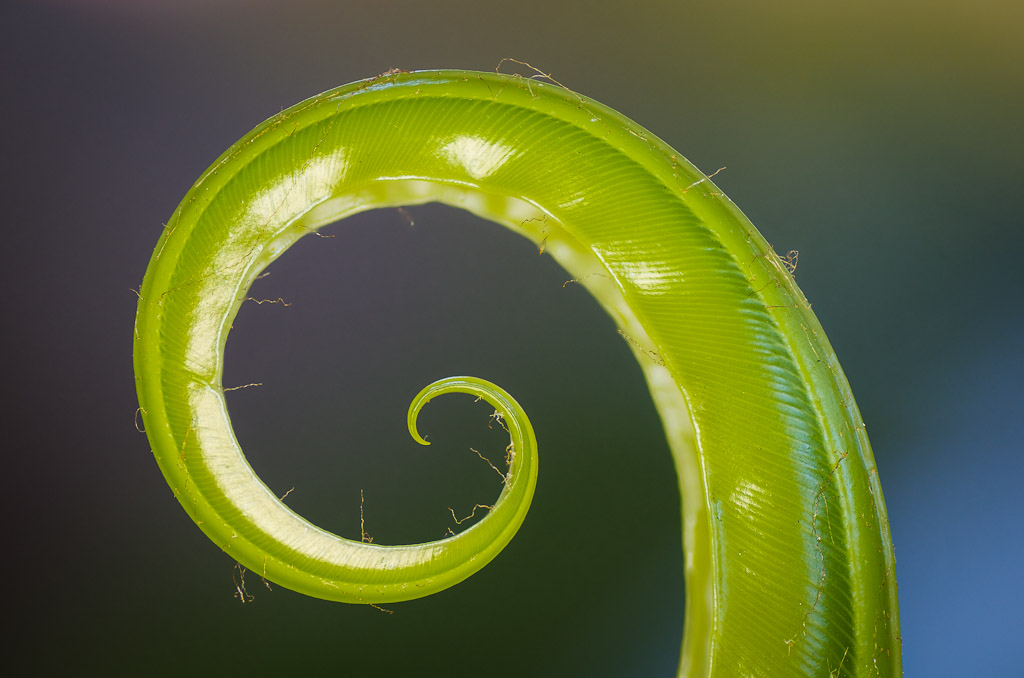
NIKON D7000 + 90.0 mm f/2.8 @ 90 mm, 1/100 sec at f/4.5, ISO 320
more to come…


-
Hi! Welcome to Rodney Campbell's Blog!
Thanks for dropping by! Feel free to join the discussion by leaving comments, and stay updated by subscribing to the RSS feed. See ya around!
Follow Me!


