Technology
OpenSolaris Developer Preview 2 (Indiana) under VirtualBox on MacBook Pro…
by Rodney Campbell on Mar.09, 2008, under Technology
I’d not heard of VirtualBox until I attended the Sun Tech Days Australia Developer Conference earlier this week.
Since it could run on OpenSolaris (and OS X), I thought I’d give it a try and test both VirtualBox AND the latest release of the OpenSolaris Developer Preview 2 (Indiana).
VirtualBox installs (from the very sleek 21MB download) like any normal Mac OS X application on my MacBook Pro running OS X 10.5.2 (Leopard) and the application is extremely easy to use (much like VMware and Parallels).
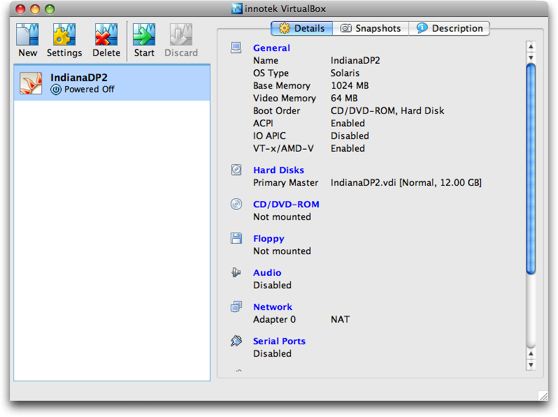
When creating my New Virtual Machine I tinkered with the default settings (giving myself 1024MB of RAM (up from the default of 128MB), a 12GB expanding disk (up from 8GB) and upgrading the video memory from 8MB to 64MB for the virtual machine).
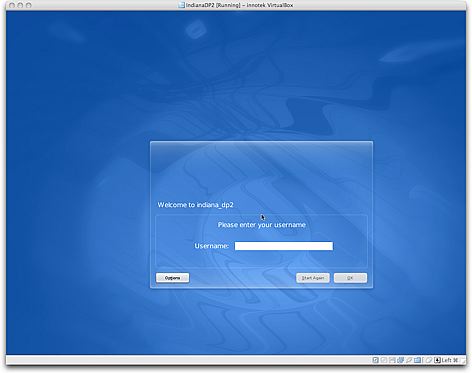
Started up the virtual machine with the OpenSolaris Developer Preview Live CD and shortly OpenSolaris is running. You can then double click the “Install OpenSolaris” icon and follow the wizard and in 15 minutes you’re installed and up and running.
Well almost! – there are a few things which don’t work as well as you would like including:
- Xorg comes up by default in 16bit with a resolution of 1024×768 – see below for more on this
- Networking doesn’t work at all – see below for the fix
- USB support isn’t working yet for Solaris guests
- Audio is not working yet for Solaris guests
- The Shared folders functionality is not working yet for Solaris guests
Some Google searching and I’ve discovered that Alan Burlison had already looked at this, so I grabbed his xorg.conf file. To get the Indiana screen resolution up to 1280×1024 – for me on OS X all I needed to do was put the tweaked xorg.conf into /etc/X11 and restart the X server (log out and back in). I’ve also tried further tinkering with this to get resolutions like 1152×864 (which does work); 1440×900 and 1680×1050 working but with little success so far – if anyone knows how to get these (later two) working with OpenSolaris under VirtualBox (on OS X or OpenSolaris) I’d be happy to hear about it.
The network devices used by the Virtualbox need the pcnet device driver (pcn on Solaris). Unfortunately, this is a closed source driver, so it’s not supplied with OSDP – Alan details using the drivers from an SXDE iso image. Masayuki Murayama however has supplied a huge list of Free NIC drivers for Solaris – one of which is the ae driver for AMD am79c97x PCNET ethernet chipset series. Unfortunately you’d have to build this from source (which you could do) – but made easier even still – Moinak Ghosh has precompiled and packaged all of Masayuki San’s drivers. You can either run the included installer script or just install the required package with:
# pkgadd -d . SFEnicdrv-ae
To make all these files accessible to your VM, they need to be made into an ISO image that you can mount in the VM, using Devices -> Mount CD/DVD-ROM -> CD/DVD-ROM Image… To make this a little easier I’ve prebuilt an ISO of the drivers and xorg.conf files which you can download from here.
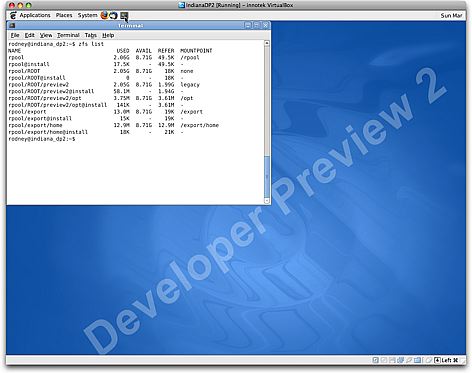
One very cool thing with this new Indiana Developer Preview of OpenSolaris is that by default the root filesystem is using ZFS – as you can see from the output of zfs list in the screenshot below.
Sun Tech Days, OpenSolaris and VirtualBox…
by Rodney Campbell on Mar.07, 2008, under Technology
I attended the Sun Tech Days Australia event here in Sydney this week along with the Community Events day on the last day. I primarily attended the Solaris and OpenSolaris tracks and found some good nuggets of information there.
Some of the most interesting information I heard were from the Virtualization Technologies sessions. I was already aware of technologies like Domains, LDOMs and Zones/Containers and had planned to take a serious look at the Hypervisor style technologies like Sun xVM/OpenSolaris xVM (based on Xen) which are now built into the latest OpenSolaris SXDE and SXCE builds.
I use and am quite familiar with the common Type 2 Hypervisor (HVM) style products like VMware and Parallels. I’ve used both predominantly on my MacBook pro, however I was previously unaware of the VirtualBox product which Sun only very recently acquired from Innotek. These guys have apparently been around for some time however it is only since the Sun acquisition that word has really started to spread. There are two really compelling features of VirtualBox which make it very interesting:
- Whilst it also has Windows and (many) Linux versions like some other competing products, and even a Mac OS X version like some others – VirtualBox also works on OpenSolaris!
- VirtualBox is Open Source (GPL2) and FREE!
I plan to blog soon about my experience with running the new OpenSolaris Developer Preview 2 (Indiana) using VirtualBox on my MacBook Pro and later on I plan to try out both VirtualBox and xVM on a new Sun Ultra 24 running OpenSolaris (Solaris Express Developer Edition Build 79b) with various guests (Windows, OpenSolaris, Linux and perhaps even OS X).
Fixing the SMB Symlink problem with Mac OS X 10.5 Leopard
by Rodney Campbell on Nov.19, 2007, under Technology
I have a number of samba shares on a Sun Solaris machine which we wish to access from a Mac running Mac OS X 10.5 Leopard. Within these shares I often have a number of symbolic links in the unix filesystem pointing to various files and directories. In Tiger everything worked just fine. But in Leopard it tries to translate these links (aliases) to the local filesystem, which of course results in the links being dead.
The problem is that Leopard’s SMB/CIFS supports the Unix Extensions, which include support for server-side symbolic links.
I havn’t yet found a solution which could fix this at the client end however adding:
unix extensions = no
to the servers smb.conf file disables these unix extensions and returns the overall functionality back to how it was with Tiger.
Telstra Next G Card Working with Mac OS X 10.5 Leopard…
by Rodney Campbell on Nov.12, 2007, under Technology
I’ve been using a Telstra Next G Turbo Express Card in my MacBook Pro for a while now and whilst it worked fine under Mac OS X 10.4 Tiger, after performing the upgrade to Mac OS X 10.5 Leopard I discovered that it no longer appeared to work.
Now that I’ve been able to get the service to work under Leopard (with no extra drivers/software/hacks/etc required) I though I would document my steps for others.
From what I can tell the main reason that the card no longer appeared to work under Leopard is that it appears that Apple built in the functionality to deal with these types of modem cards into the core operating system (rather than using third party drivers and application software as we had to do under Tiger). This meant that the old method software no longer worked and to get things to work you had to configure things correctly using the built in services.
I am using the (orange Telstra Business) Option GT Express form of the Telstra Turbo Card (for the ExpressCard/34 slot in my MacBook Pro) however these instructions may well work for the other card formats (e.g. USB and PCMCIA/CardBus).
Update: I think there are various versions of the data card from multiple vendors – if you look on the back of the card you should hopefully be able to tell which vendor makes your card and adjust the following instructions accordingly. e.g. on the back of my card it says it is an “Option Model GE0202” – so I suspect it is a rebadged one of these: Option GlobeTrotter EXPRESS 7.2. Other people may have the Sierra Wireless AirCard – in which case you may want to try adjusting the following instructions (NB: I havn’t tested this as I don’t have the Sierra card) by:
- Uninstalling the SierraWatcher software in the first step (if you have it installed).
- I presume that in the Network System Preferences panel where you add the new connection that instead of the device appearing as “Globetrotter HSDPA Modem” it will appear as something like “AirCard”.
- Later on where I’ve selected “Option” in the vendor list for the connection select “Sierra” instead.
The first step you should do is uninstall the GlobeTrotter Connect software if you have that installed.
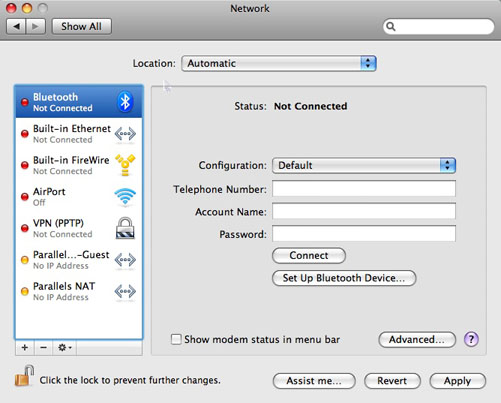
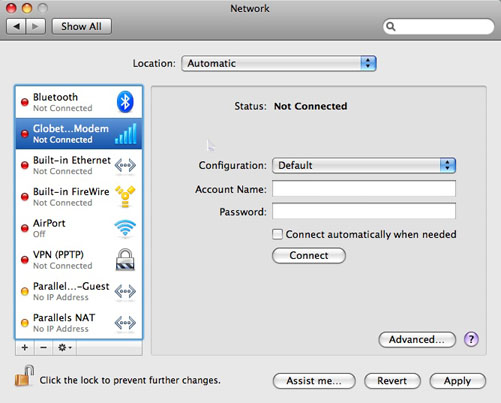
Now insert your Telstra Turbo Card and open up your Network System Preferences panel:
If an entry for your Turbo Card Modem doesn’t appear in the list automatically you can add it by clicking the plus “+” symbol at the bottom left of the window and then select the modem hardware from the pull down Interface list:

The Modem should appear in the column list on the left of the Network System Preferences pane:
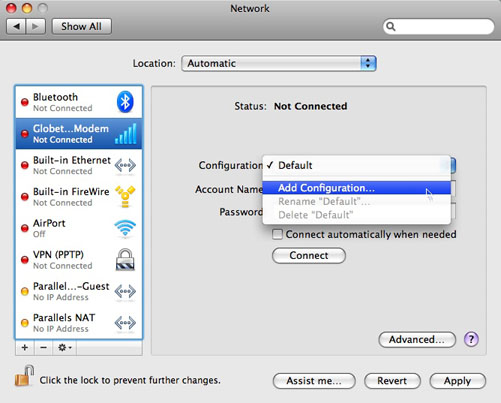
Now we are going to add a new Network Configuration to use this modem. Click the pull down Configuration menu and select “Add Configuration…“:
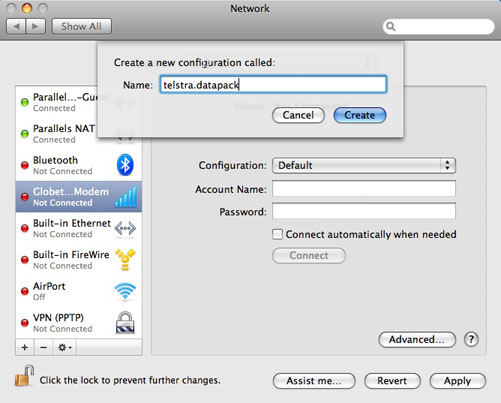
Give the Configuration a name (I’ve called mine “telstra.datapack“) and click “Create“:
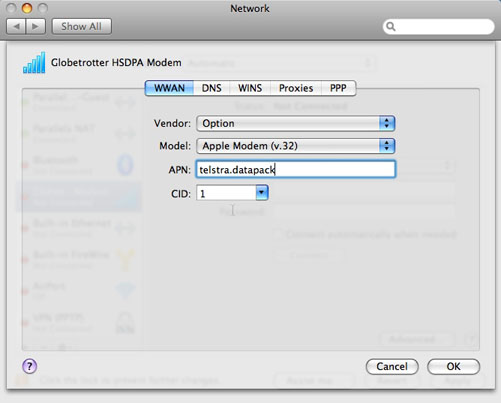
Now with this new Configuration selected click the “Advanced…” button in the bottom right and in the first Tab (WWAN) pull down the vendor list to one of the selections. In my case I have an “Option Express Card Turbo Modem” so I selected Option (I’m not sure it really matters what you select):
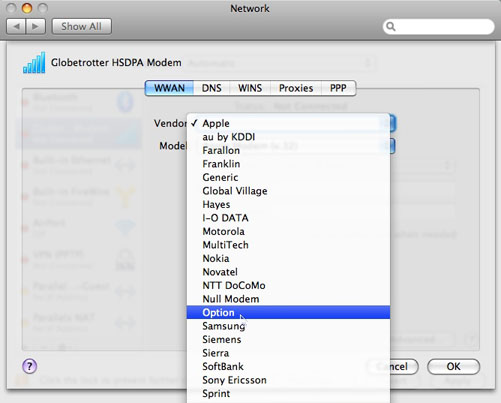
You can ignore the Model field for now – it appears to create and select the correct option by itself later. In the APN field you have to enter one of the four APN’s (Access Point Names) that Telstra appears to use:
- telstra.pcpack
- telstra.datapack
- telstra.internet
- telstra.bigpond
These do not appear to be case sensitive and I’m not exactly sure what the differences are between them – I’ve tried all three and they appear to work. You should however select the APN that matches the particular plan you are on for your card (otherwise you are likely to be billed incorrectly). From what I can tell pcpack is for time based charging (and is older and no longer used?), datapack and internet are both for data volume charging (with internet being for the lower volume plans and datapack for the higher volume plans?) and finally bigpond is for the BigPond (Blue?) cards. Shown here is the telstra.datapack one. You do not need to enter anything into the Account Name and Password fields:
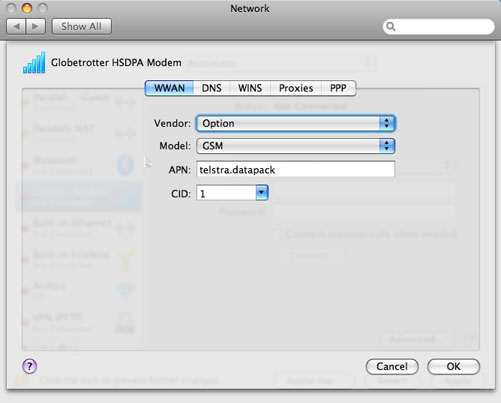
If you then click OK to save the settings and then go back into this dialog (clicking Advanced) you will notice that the Model field now says “GSM“:
Update 2: If you are using a Telstra BigPond service (not the Telstra Business service) then you will also most likely need to complete one extra step. In the Network System Preferences pane there are entries for Account name and Password. For the Telstra Business plans these are left blank, however for the BigPond plans you will likely need to put in your Account name as username@bigpond.com (where username is your BigPond Username) and your BigPond password.
Now click Apply in the Network System Preferences pane and that is basically it.
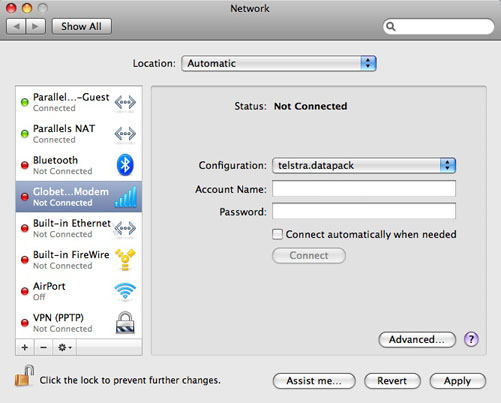
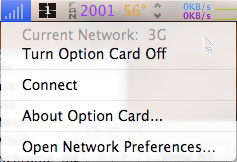
To now make use of your Next G Turbo Card just go to this preference panel and click “Connect” and after a few seconds you should be connected and the panel changes to like the following:
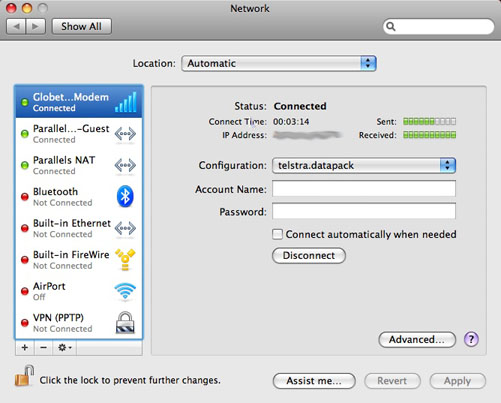
You may also get a new MenuBar icon appearing whenever you insert the card – which allows you to select to Connect and Disconnect right from the MenuBar:
Hope this helps…
Installing Windows Vista using Bootcamp on a MacBook Pro
by Rodney Campbell on Feb.13, 2007, under Life, Technology
I recently installed Windows Vista under Parallels (I’m running the latest Beta – Build 3150) which worked fine except as Parallels does not yet support 3D graphics acceleration you don’t get any of those nice Aero Glass effects.
To see how well Vista can run on a Mac I decided to give Apple’s Bootcamp beta (version 1.1.2) a try.
Installation of Bootcamp is painless and after making a 20GB partition for windows and creating the Macintosh Bootcamp Drivers for Windows XP CD I was ready to boot the Vista installation DVD.
After going through the normal process of installing Windows Vista (it autodetects and installs drivers for just about all of the MacBook Pro’s hardware – including as it happens my Apple Bluetooth keyboard and Bluetooth Wireless Mighty mouse) I manually installed a few more things to get Vista working just right.
First off ethernet and graphics drivers work out of the box (including Aero) however I updated the ATI catalyst drivers (including support for the Mobility Radeon X1600) to the latest Vista release from Catalyst 7.1 Display Driver for Windows Vista (32 bit).
To enable iSight and Sound you will need to manually extract and install the drivers from the Macintosh Bootcamp Drivers for Windows XP CD you made before – to do this insert the CD into the drive and run the following from a DOS command prompt under Windows Vista:
D:\Install Macintosh Drivers for Windows XP.exe /A /v
and follow the prompts to extract the drivers to a location.
To install the Sound driver navigate to the location where you extracted the drivers and go to the "program files\Macintosh Drivers for Windows XP 1.1.2\SigmaTel" folder and double click the setup.exe file in there.
To install the iSight driver Launch the Control Panel and go into the Device Manager. Go to sub-category called "Imaging Devices". iSight should be listed there. Right click the item and select "Update Driver Software". Manually install the driver by choosing "Browse My Computer For Driver Software", tick "Let Me Pick From a List…" and tick "Have Disk". Now navigate to your drivers folder and select the iSight.inf file in the "program files\Macintosh Drivers for Windows XP 1.1.2\iSight" folder. Install the driver.
Instead of installing the BootCamp Apple Keyboard driver and Brightness Controller program I suggest you just install the excellent Input Remapper software. This little gem basically gives you all the Apple Function key functionality available in OS X (F1 and F2 Screen Brightness, F3 Mute, F3 and F4 Volume Down and Up, F6 Num Lock, F8 F9 and F10 Keyboard Backlighting controls, F11 and F12 Media Playback controls and Eject plus things like Ctrl-Alt-Del.
BTW: My Vista Ratings (for my 17" MacBook Pro – 2.33GHz Core 2 Duo, 3GB RAM, 160GB 5400RPM HD) were:
Processor: 5.2
Memory (RAM): 4.7
Graphics: 4.9
Gaming Graphics: 4.9
Hard Disk: 4.8
-
Hi! Welcome to Rodney Campbell's Blog!
Thanks for dropping by! Feel free to join the discussion by leaving comments, and stay updated by subscribing to the RSS feed. See ya around!
Follow Me!


